Deploying a Two-Tier Application with Docker

Release Management Professional | Transitioning to DevOps
With a proven track record in Release Management, I'm on an exciting journey to transition into the world of DevOps. I specialize in orchestrating the smooth deployment of software and applications, and I'm now gearing up to bridge the gap between development and operations.
My passion lies in optimizing release processes, automating deployments, and ensuring the efficiency of IT operations. I'm actively enhancing my skill set in DevOps practices, including cloud technologies, scripting, and CI/CD pipelines.
I'm keen to connect with professionals who share this enthusiasm and explore opportunities for mutual growth and collaboration in the DevOps domain. Let's connect and exchange insights about the evolving landscapes of Release Management and DevOps!
#ReleaseManagement #DevOps #EfficiencyOptimization
Section 1 : Setting Up Your Development Environment:
Installing Docker:
Walk through the process of installing Docker on your machine. Provide step-by-step instructions for different operating systems. Here we are using ubuntu as a base machine.
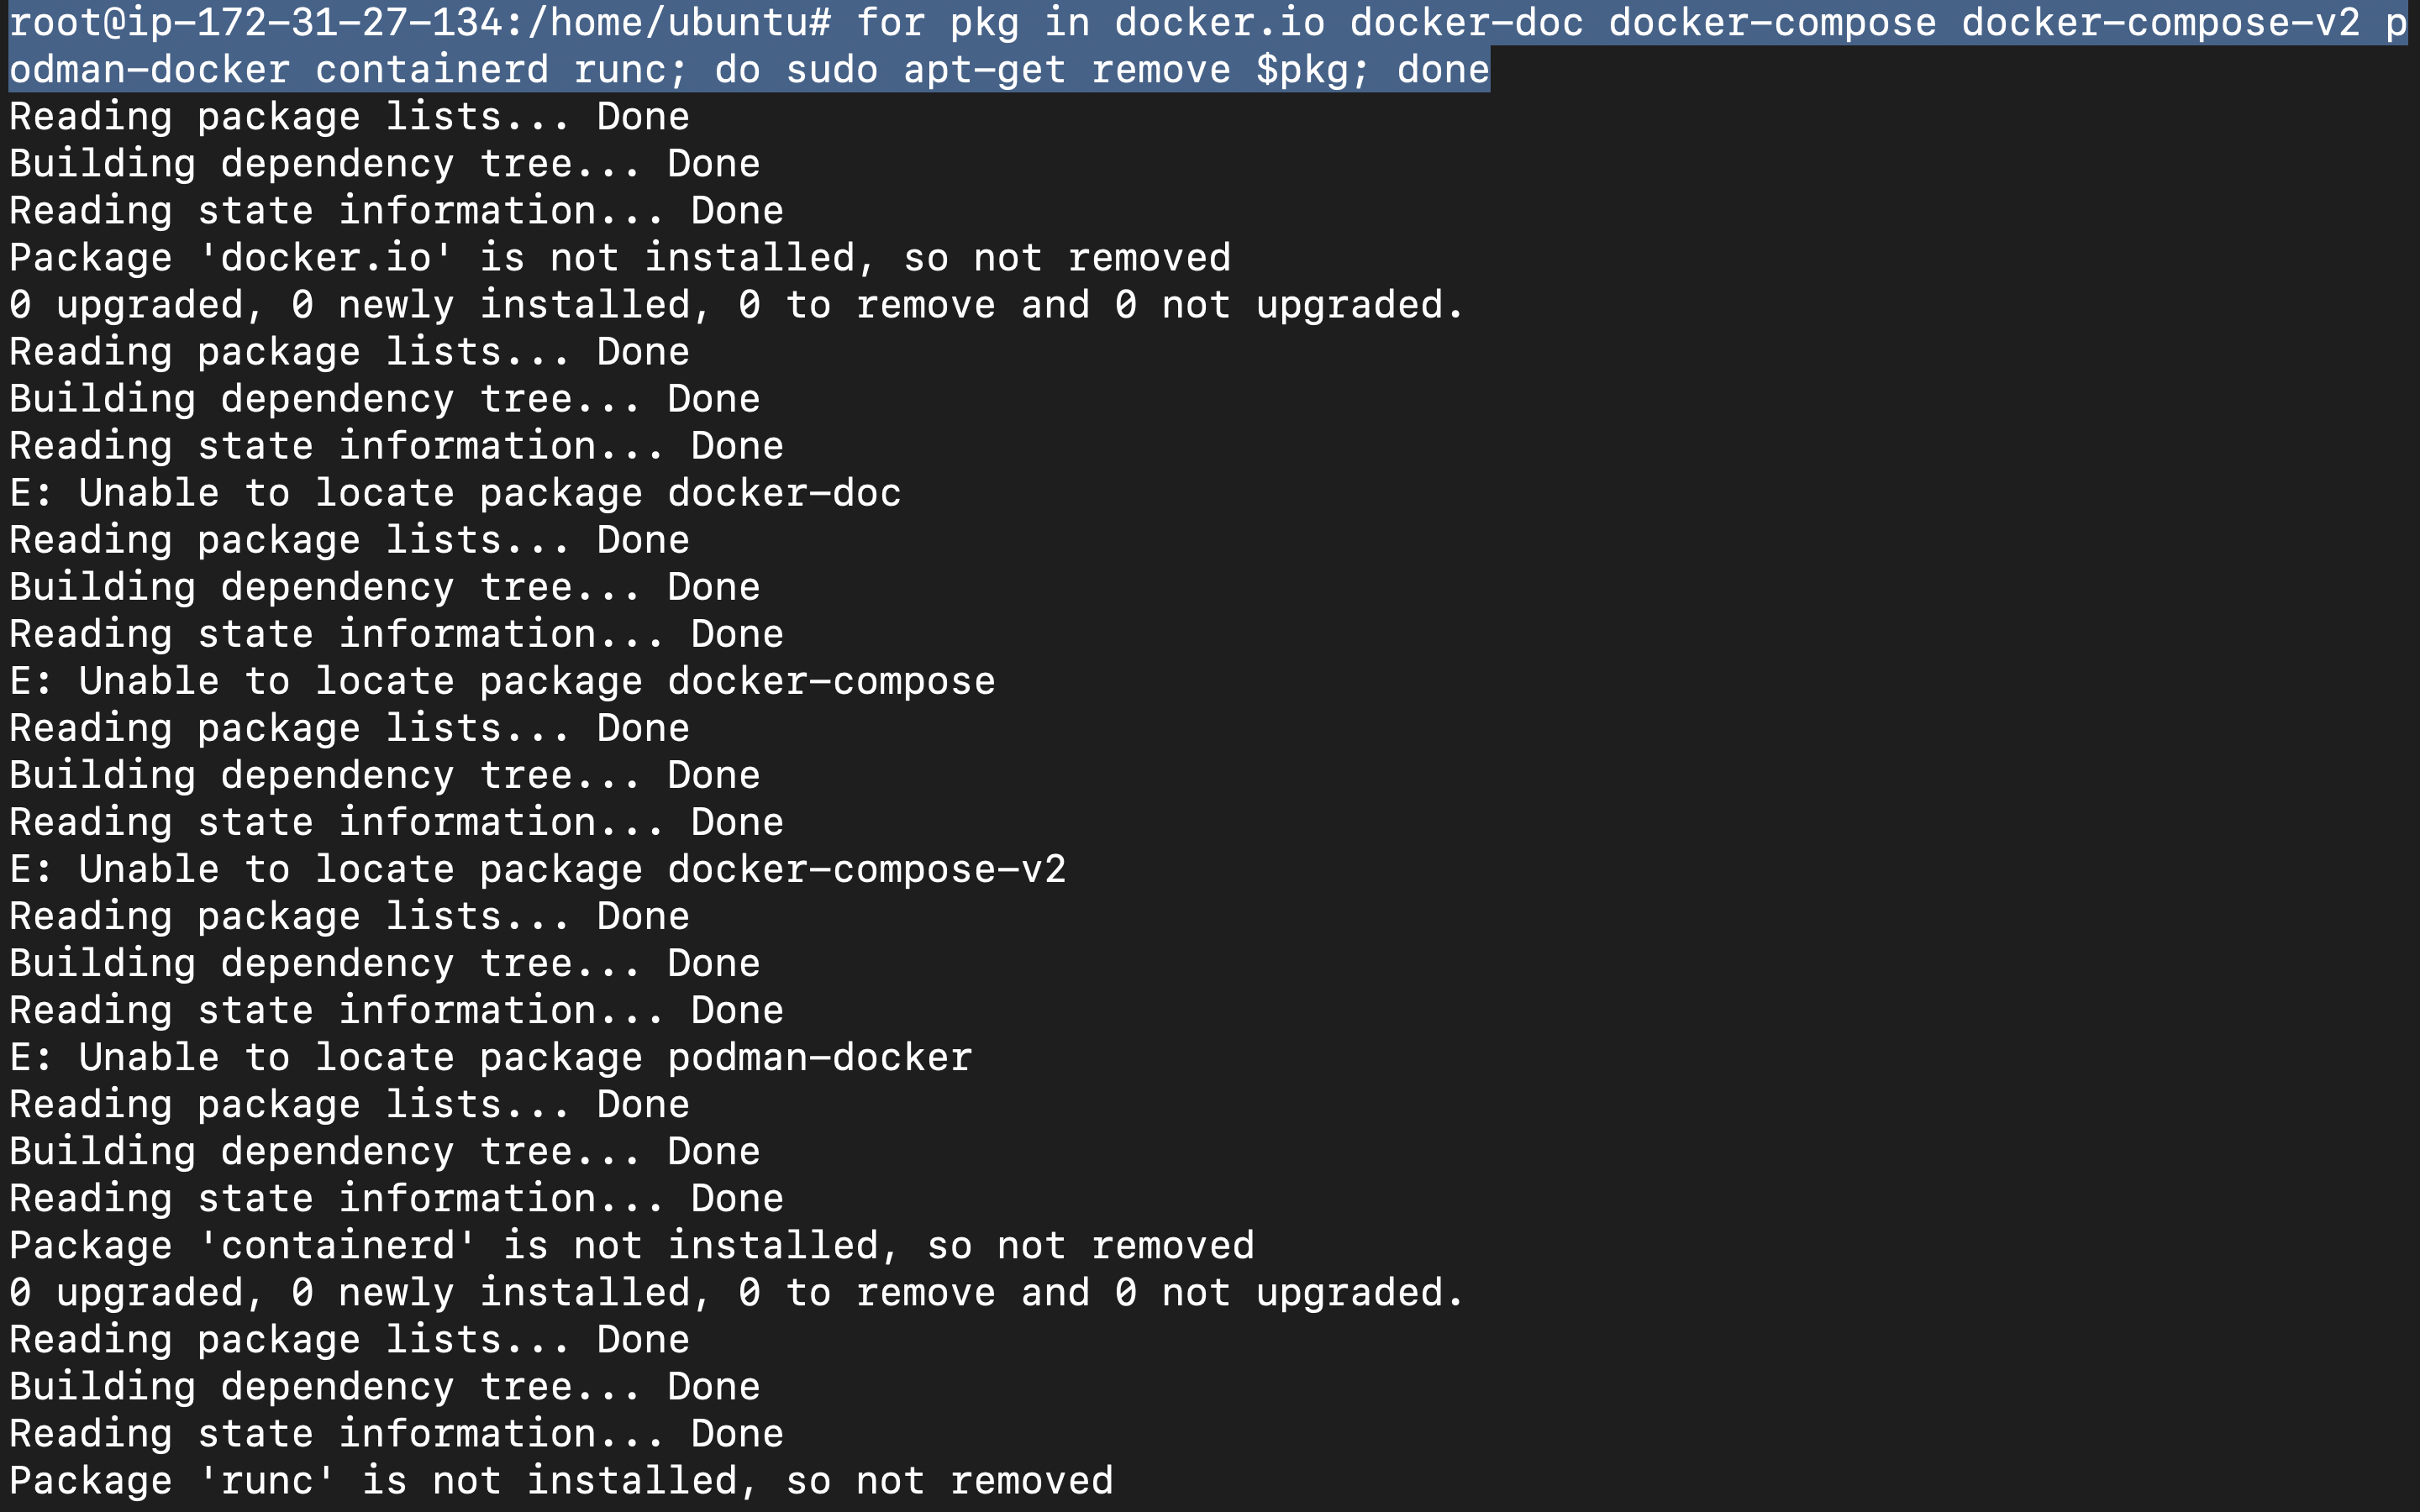
- Run the following command to uninstall all conflicting packages:
for pkg in docker.io docker-doc docker-compose docker-compose-v2 podman-docker containerd runc; do sudo apt-get remove $pkg; done
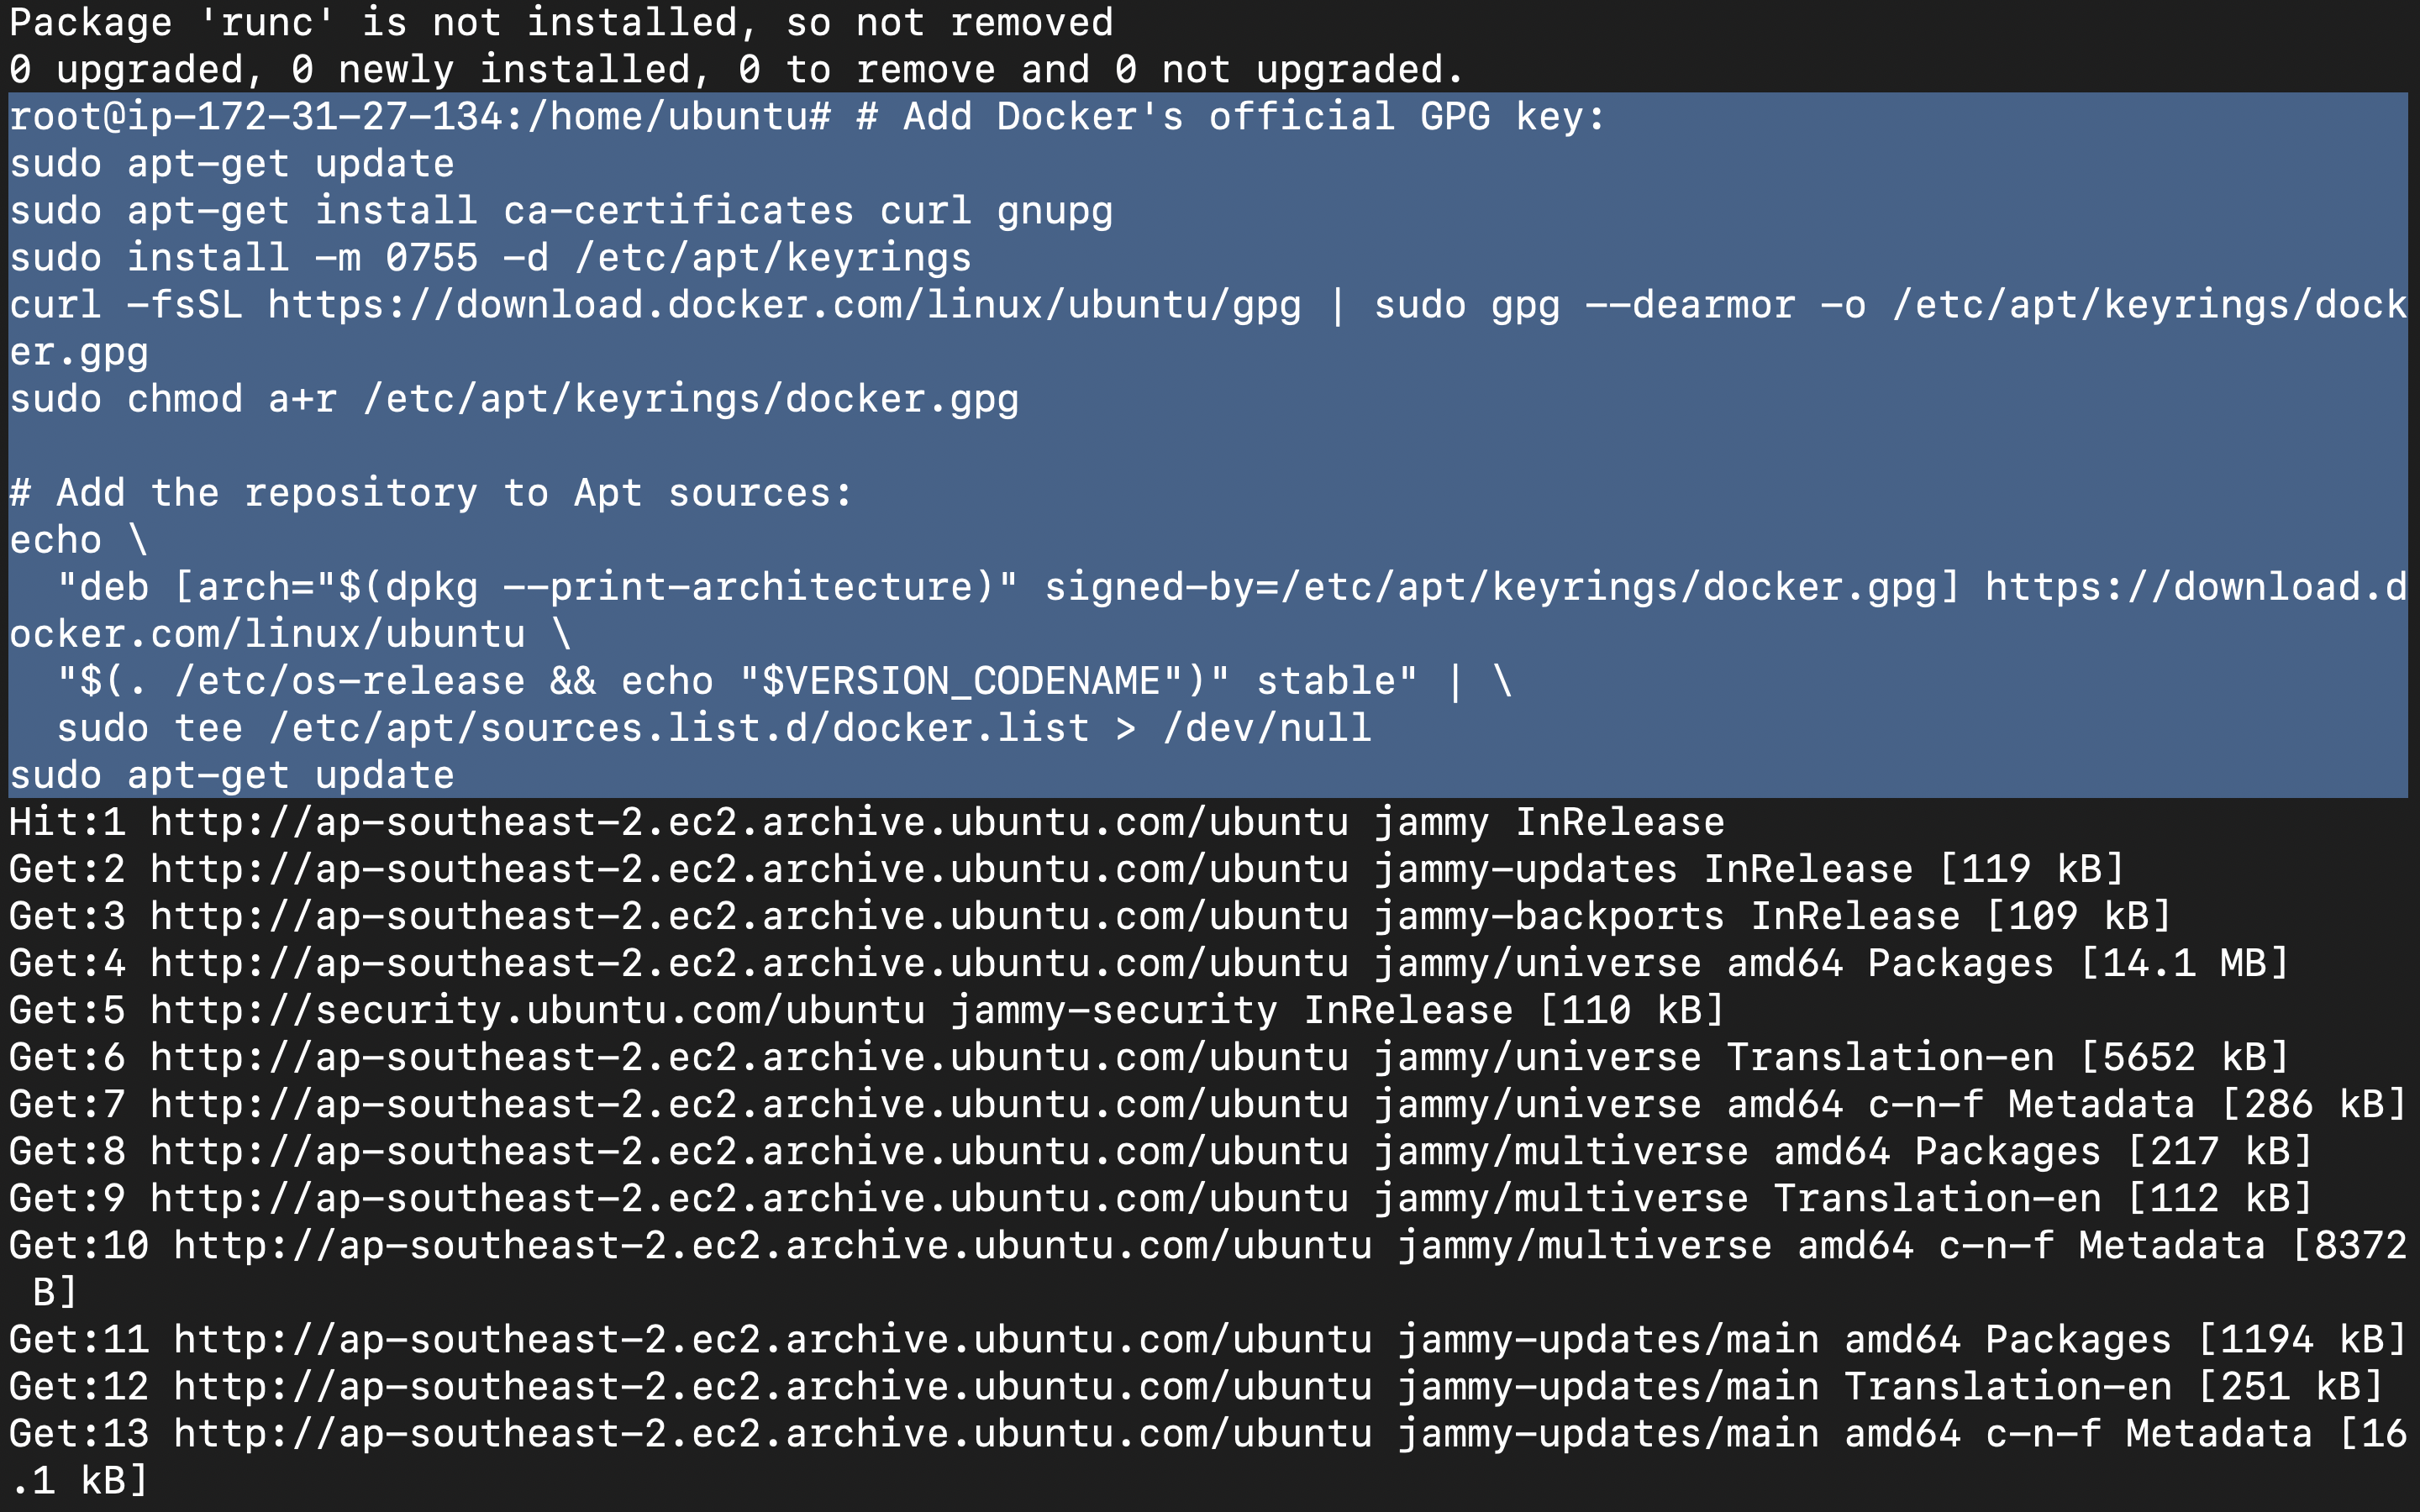
Before you install Docker Engine for the first time on a new host machine, you need to set up the Docker repository. Afterward, you can install and update Docker from the repository.
- Set up Docker's
aptrepository. Press Yes or Y in case of prompt.
# Add Docker's official GPG key:
sudo apt-get update
sudo apt-get install ca-certificates curl gnupg
sudo install -m 0755 -d /etc/apt/keyrings
curl -fsSL https://download.docker.com/linux/ubuntu/gpg | sudo gpg --dearmor -o /etc/apt/keyrings/docker.gpg
sudo chmod a+r /etc/apt/keyrings/docker.gpg

# Add the repository to Apt sources:
echo \
  "deb [arch="$(dpkg --print-architecture)" signed-by=/etc/apt/keyrings/docker.gpg] https://download.docker.com/linux/ubuntu \
  "$(. /etc/os-release && echo "$VERSION_CODENAME")" stable" | \
  sudo tee /etc/apt/sources.list.d/docker.list > /dev/null
sudo apt-get update
- To install the latest version, run:
sudo apt-get install docker-ce docker-ce-cli containerd.io docker-buildx-plugin docker-compose-plugin
If you're getting any errors i recommend you to visit here: Documentation

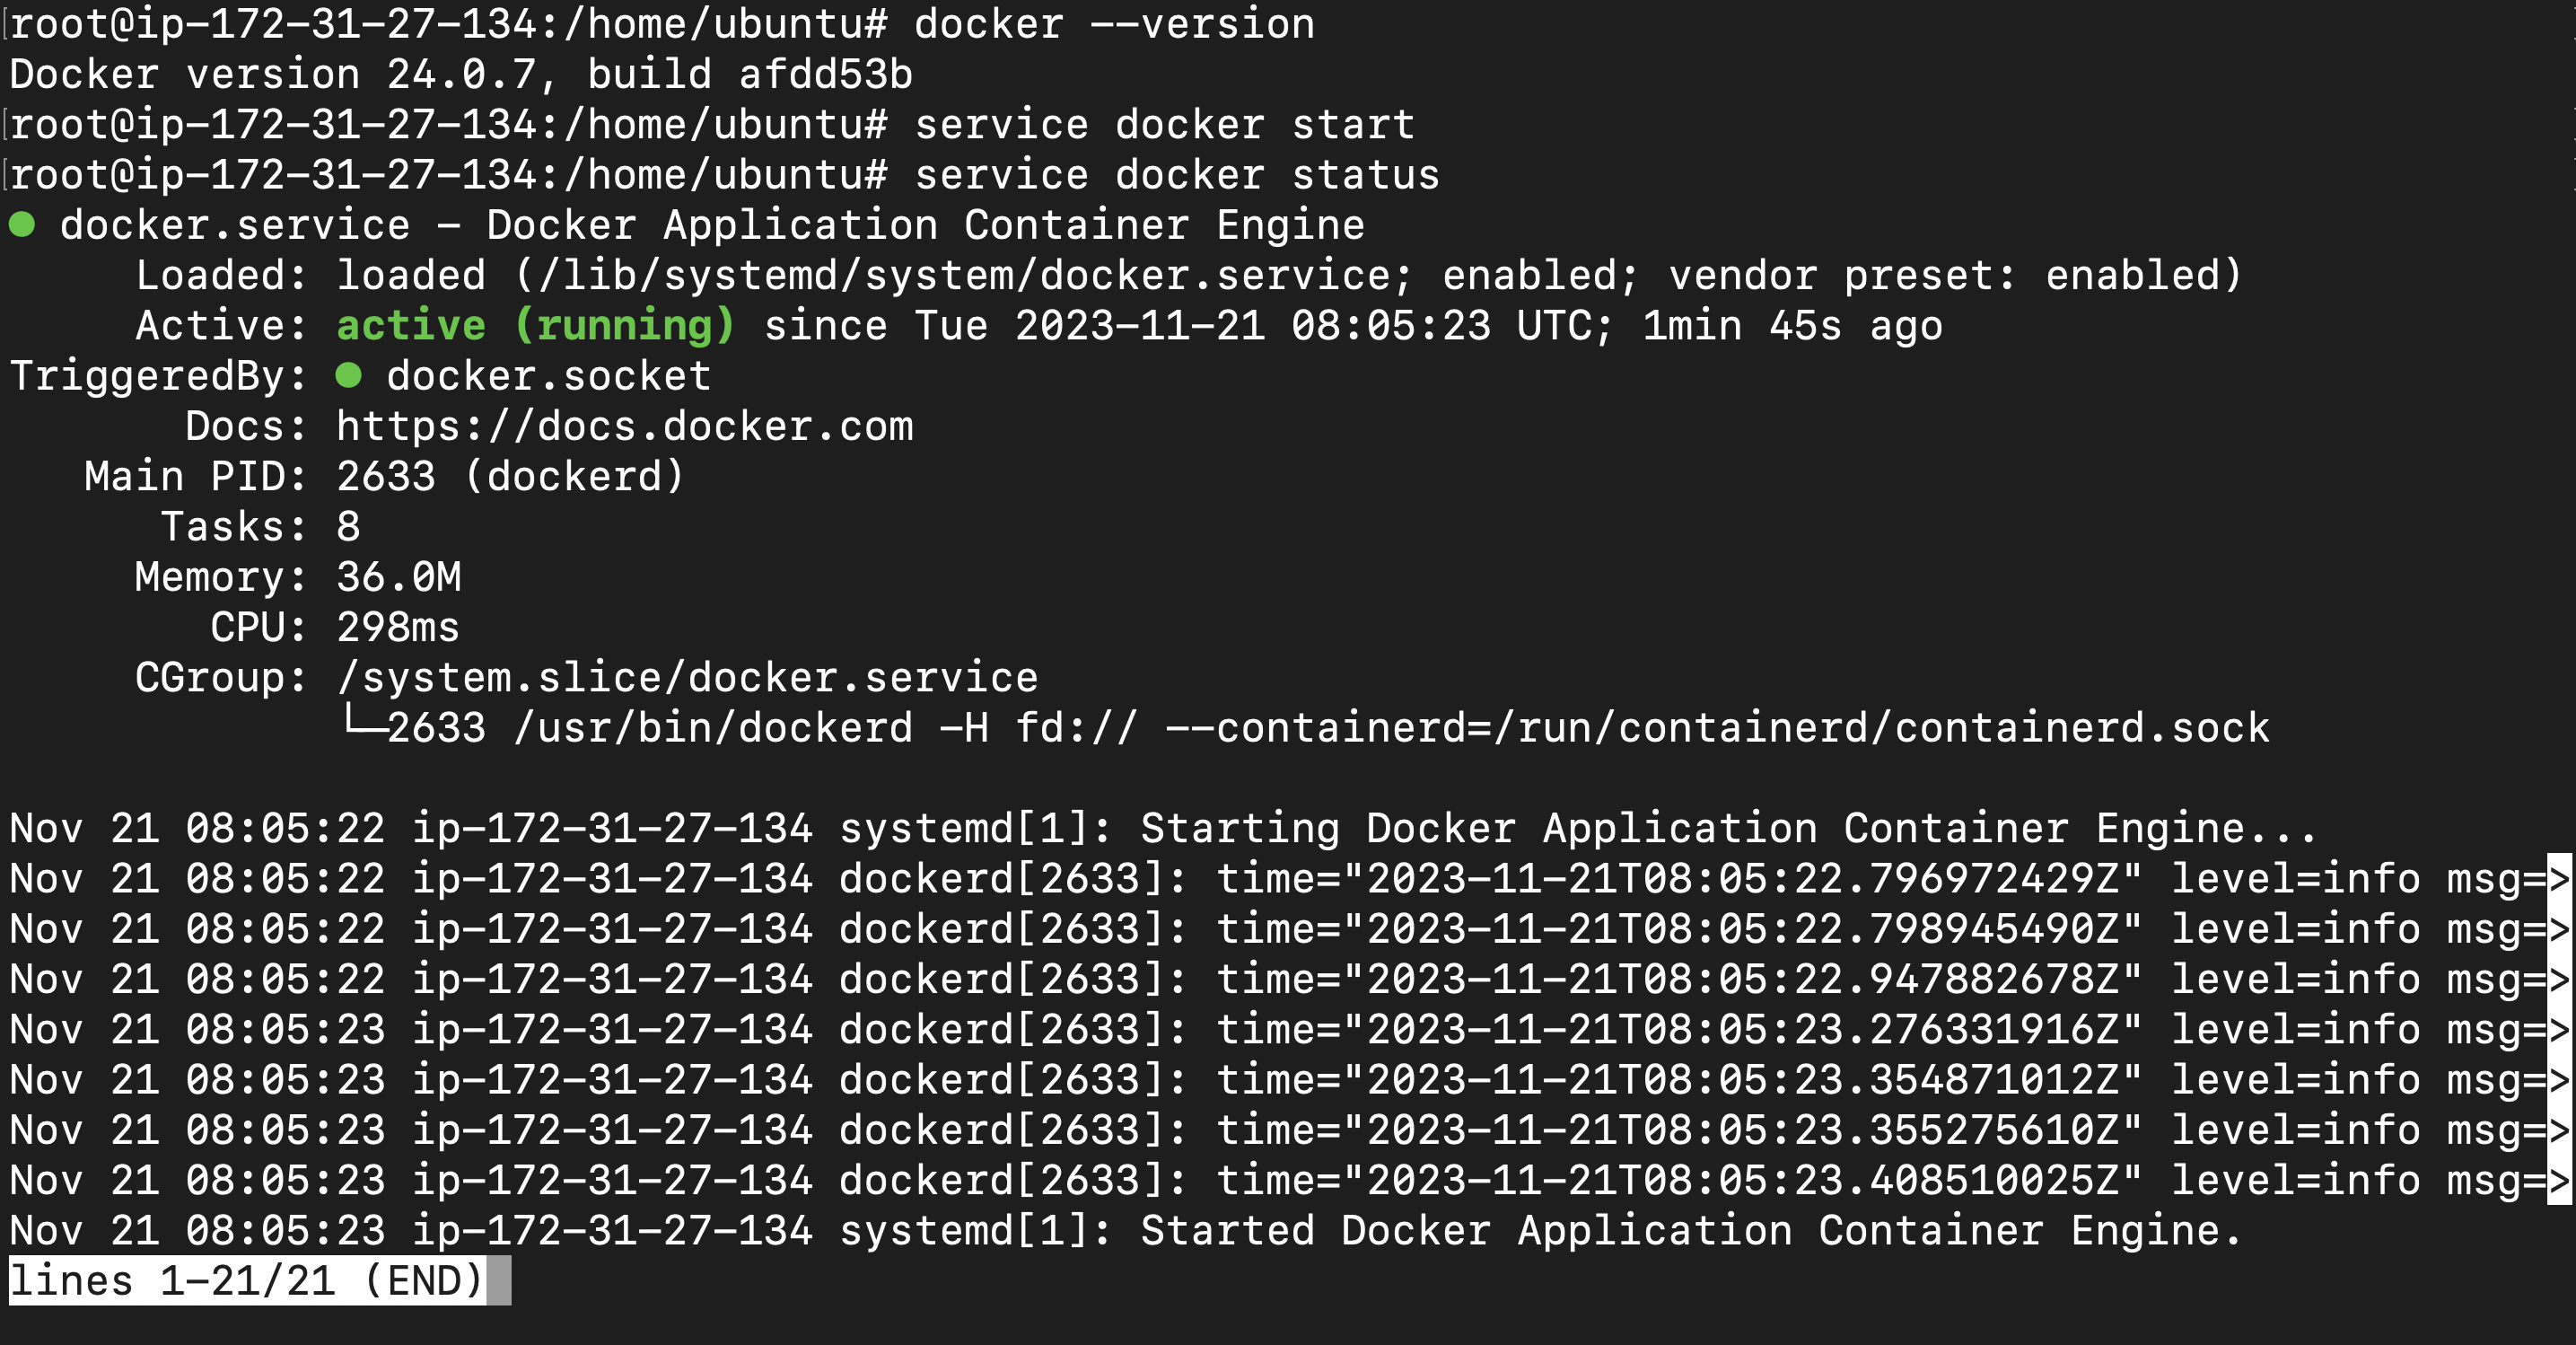
Now verify the installation execute the below command
docker --version

Enable docker service
service docker start
service docker status
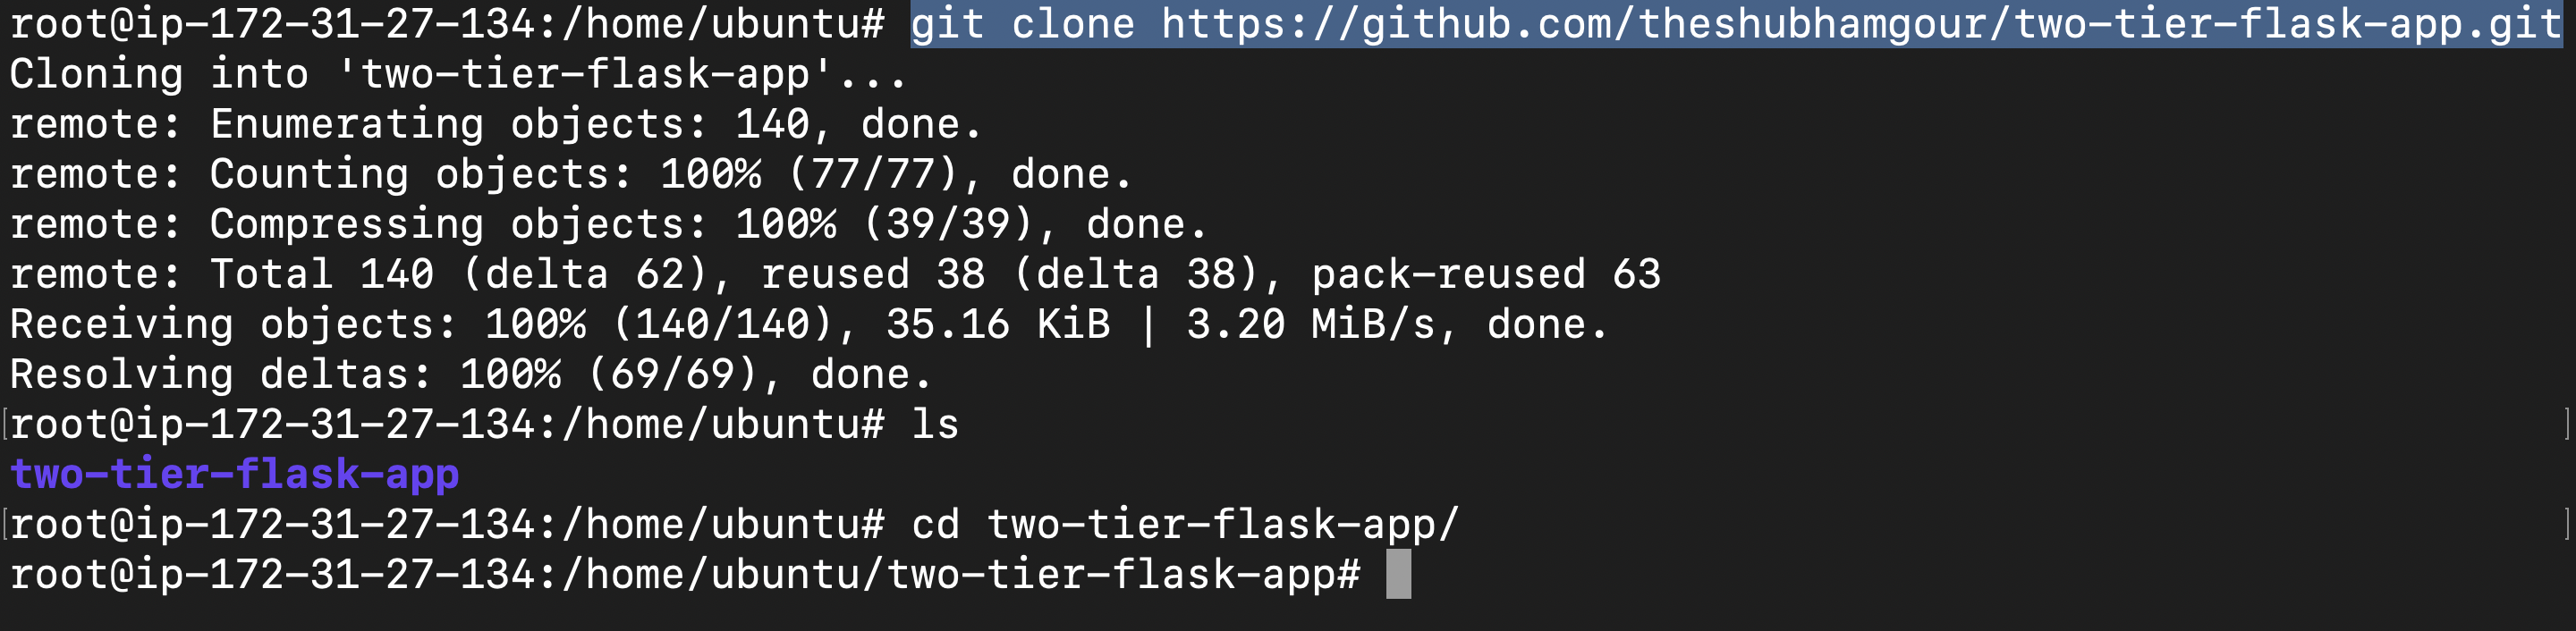
- Setting up the GitHub project: Below is the project we will be using :
https://github.com/theshubhamgour/two-tier-flask-app.git

- Clone the project :
git clone https://github.com/theshubhamgour/two-tier-flask-app.git
Section 2 : Building Docker images and containers
Before we dive into Docker, let's briefly revisit the design of our two-tier application. Our example will consist of a simple web application as the front end and a MySQL database as the back end.
docker build -t flask-app .

Here's what's happening:
docker build: This is like telling Docker, "Hey, get ready, we're making something cool."
-t flask-app: The
-tis for "tag," and we're giving our creation a name - let's call itflask-app.. (dot): This is your way of saying, "Everything I need to build this awesomeness is right here in this directory."
Check the image is now created :
docker images

Now that we have created the docker image of the flask-app it is time to create the image for MySQL
docker run -d -p 3306:3306 -e MYSQL_DATABASE=testdb -e MYSQL_USER=admin -e MYSQL_PASSWORD=admin -e MYSQL_ROOT_PASSWORD=test@123 --name mysql mysql:latest
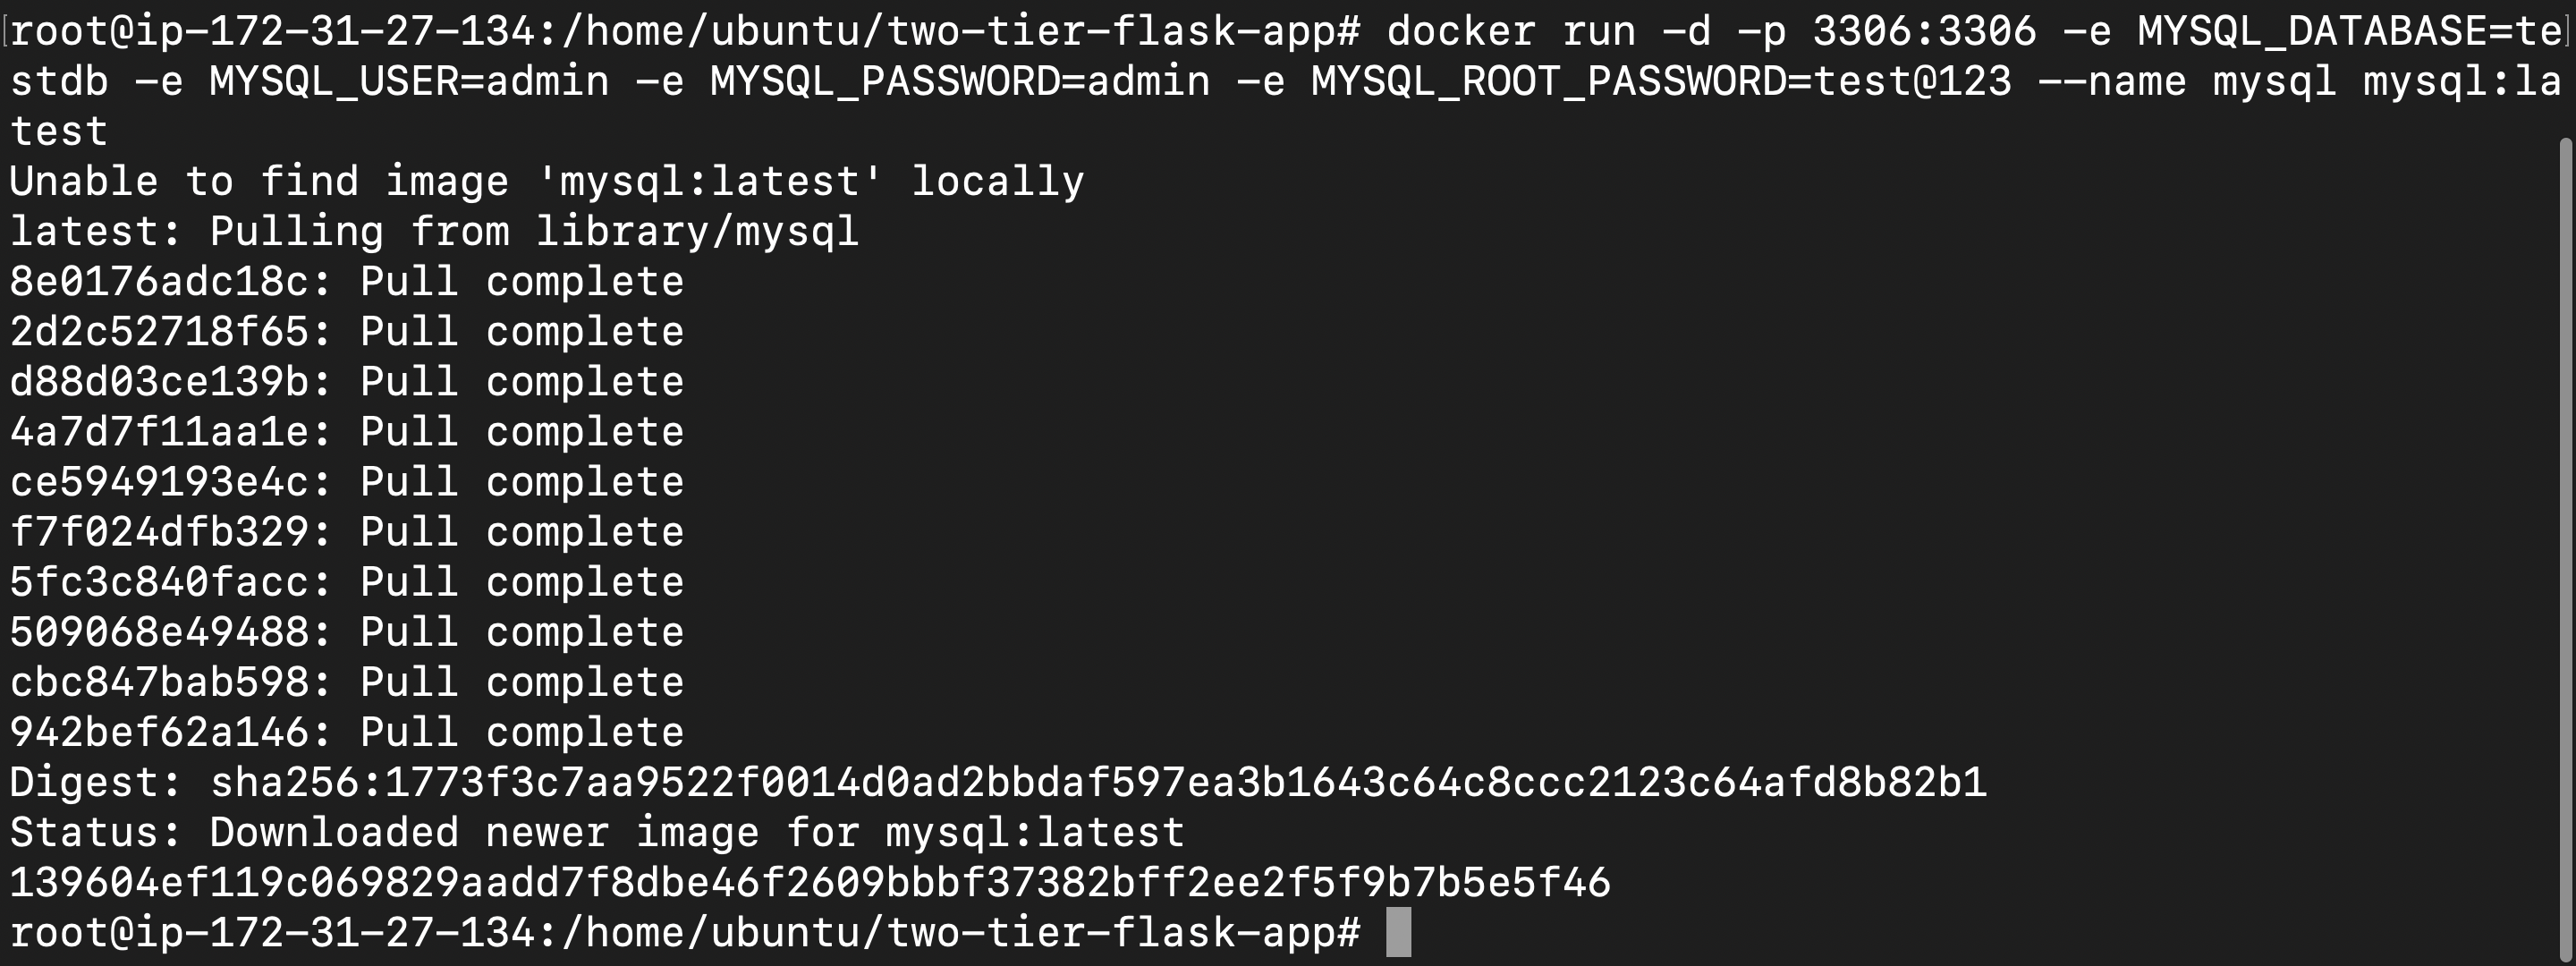
docker run: Think of it as the magic words that bring your container to life.
-d: This one's like saying, "Hey, Docker, run this in the background so I can do other cool stuff."
-p 3306:3306: It's like opening a door (port 3306) on your computer so you can talk to MySQL inside the container.
-e: These are like secret messages you're passing to MySQL inside the container.
MYSQL_DATABASE=testdb: "Hey MySQL, create a database called testdb."MYSQL_USER=admin: "Introducing your main user, admin."MYSQL_PASSWORD=admin: "And admin's secret password is... well, admin!"MYSQL_ROOT_PASSWORD=test@123: "Oh, and don't forget the big boss's password - test@123."
--name mysql: This is like giving your container a name – let's call it
mysql.mysql:latest: You're saying, "I want to use the latest version of MySQL, please."
Launching Your Flask App with MySQL
docker run -d -p 5000:5000 -e MYSQL_HOST=mysql -e MYSQL_USER=admin -e MYSQL_PASSWORD=admin -e MYSQL_DB=testdb flask-app:latest

docker run: The magical phrase that commands Docker to kickstart your container.
-d: Shorthand for saying, "Run this in the background; I've got other tricks up my sleeve."
-p 5000:5000: Opens the door at port 5000 on your computer, ready to welcome your Flask app.
-e: More secret messages for your Flask app to talk to MySQL.
MYSQL_HOST=mysql: "Hey Flask, MySQL lives at the address 'mysql'."MYSQL_USER=admin: "Introducing your database user, admin."MYSQL_PASSWORD=admin: "Admin's secret password? You guessed it - admin."MYSQL_DB=testdb: "And the chosen kingdom for your app is testdb."
flask-app:latest: You're saying, "Docker, meet my Flask app. It's the latest and greatest version!"
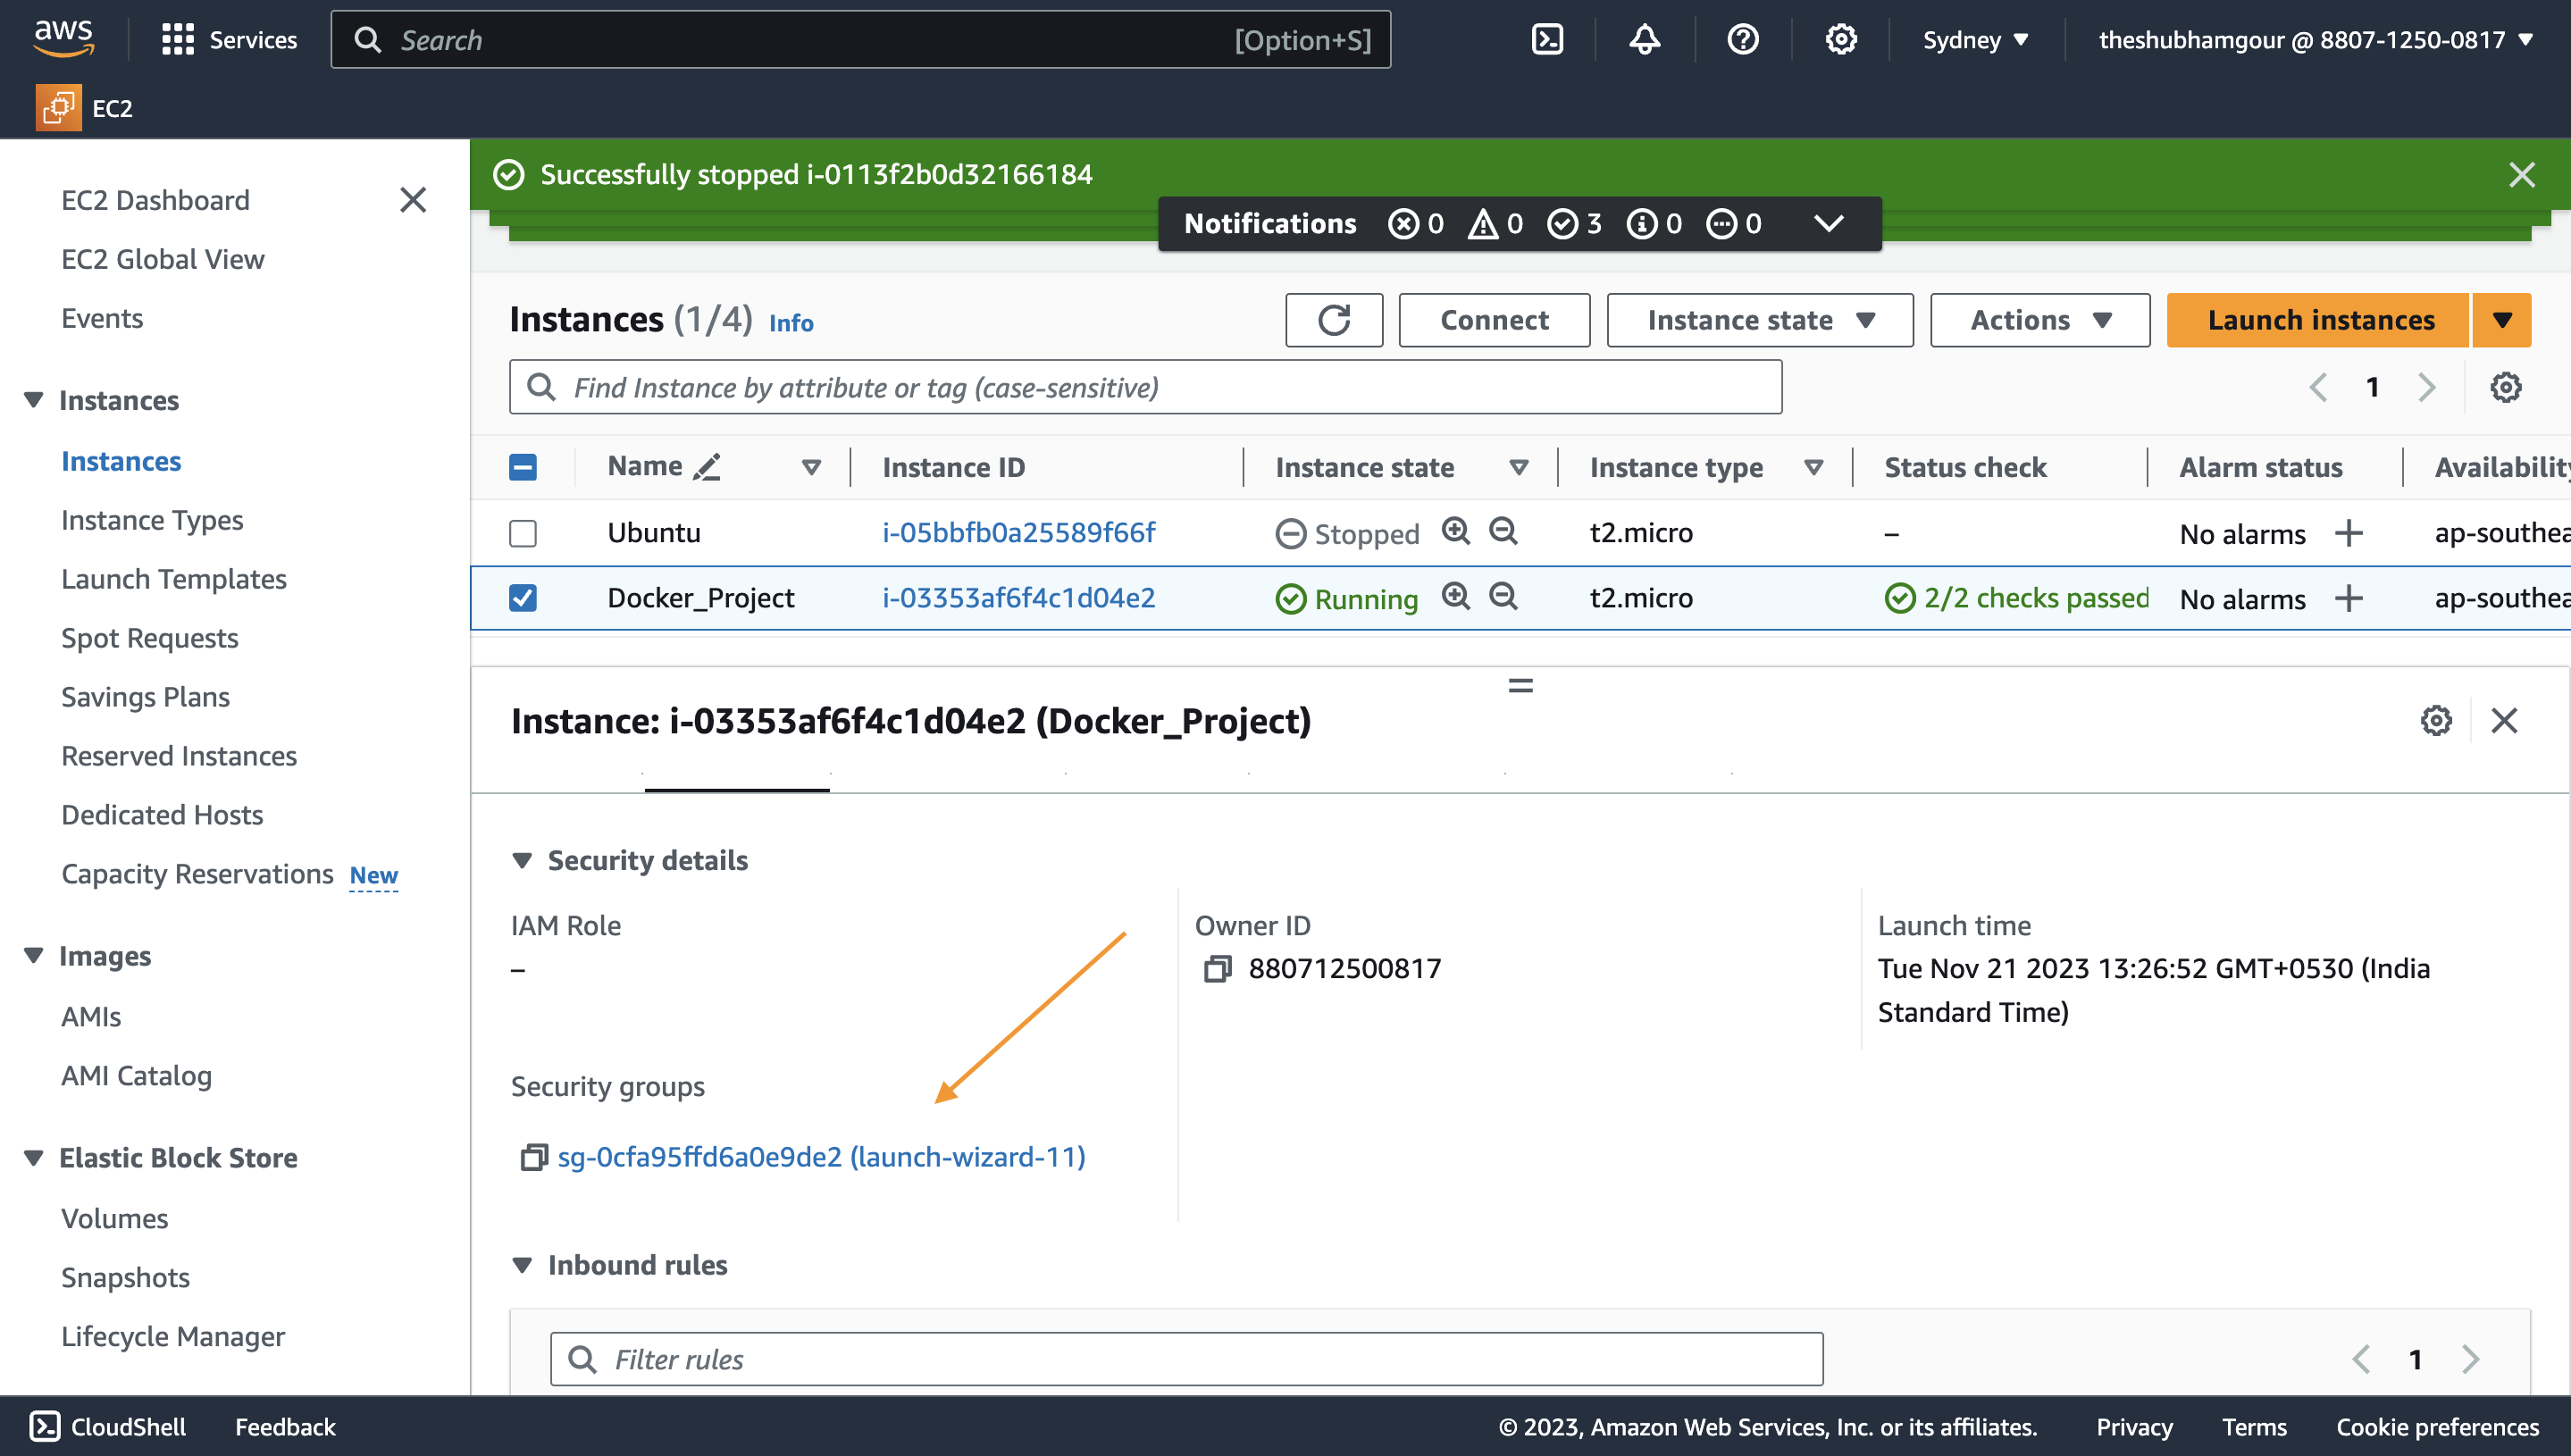
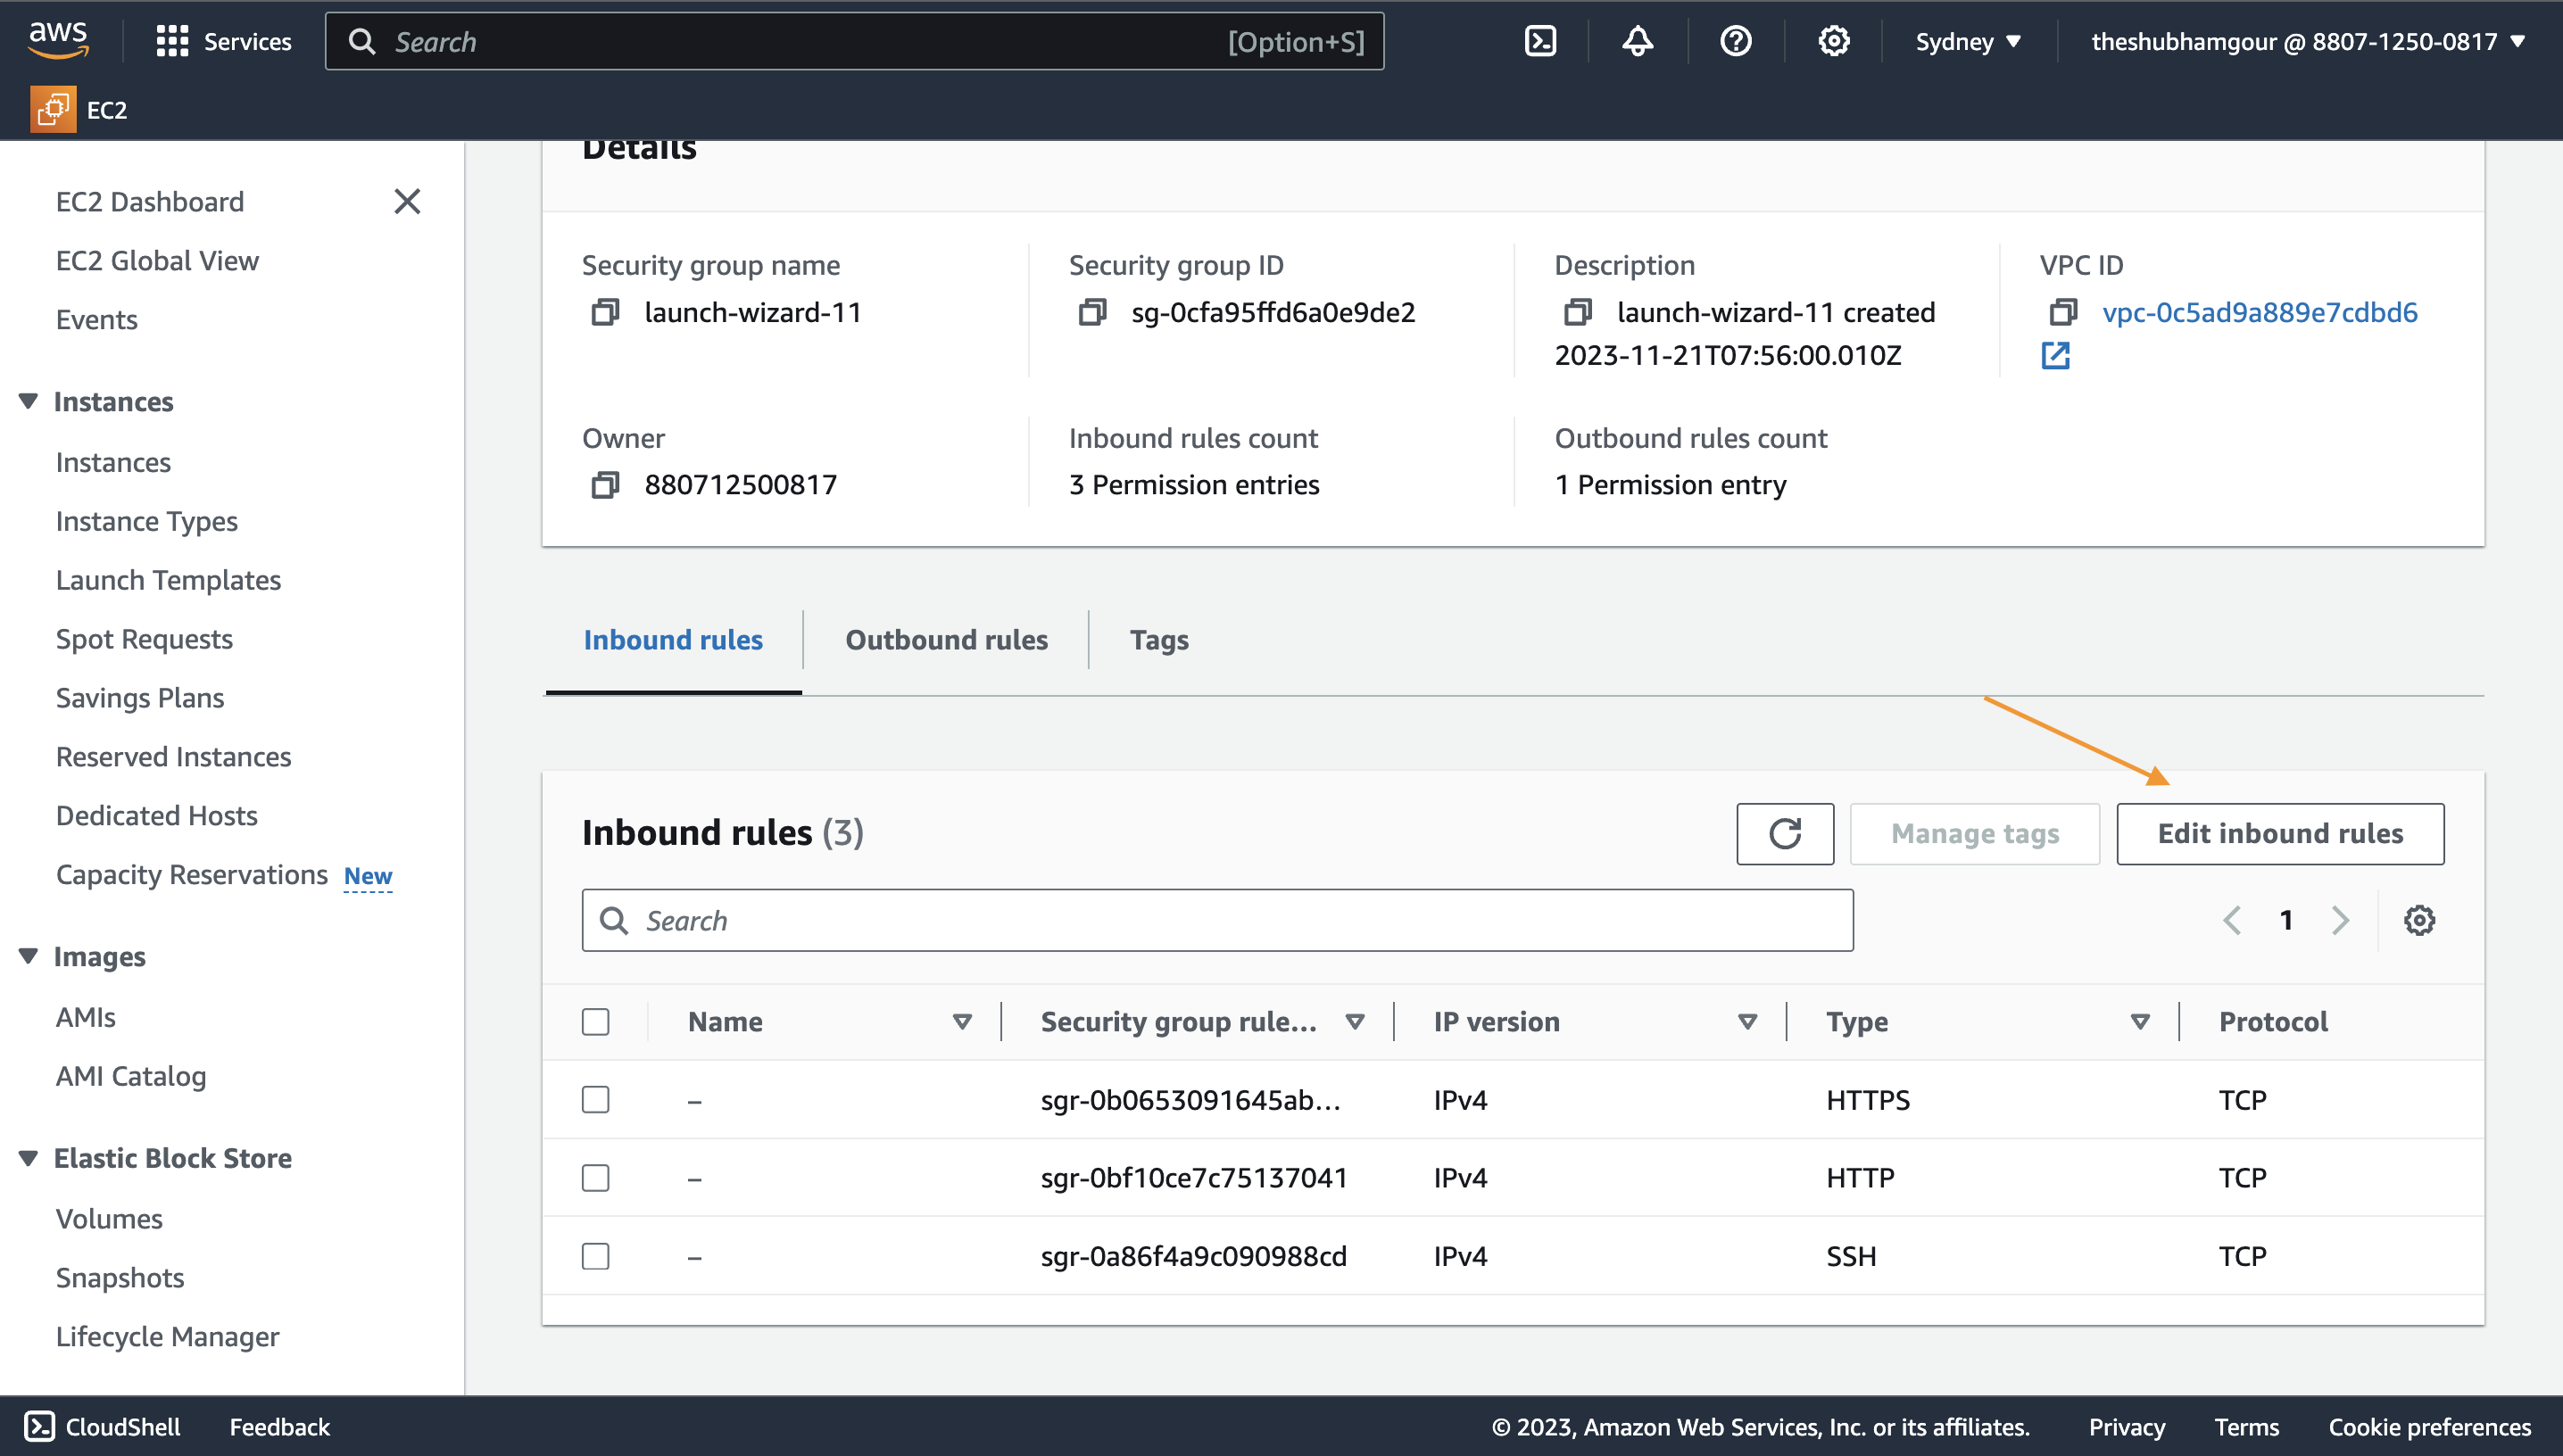
Section 3 : Enable Ports on AWS
Now let's enable the ports on Security groups on AWS
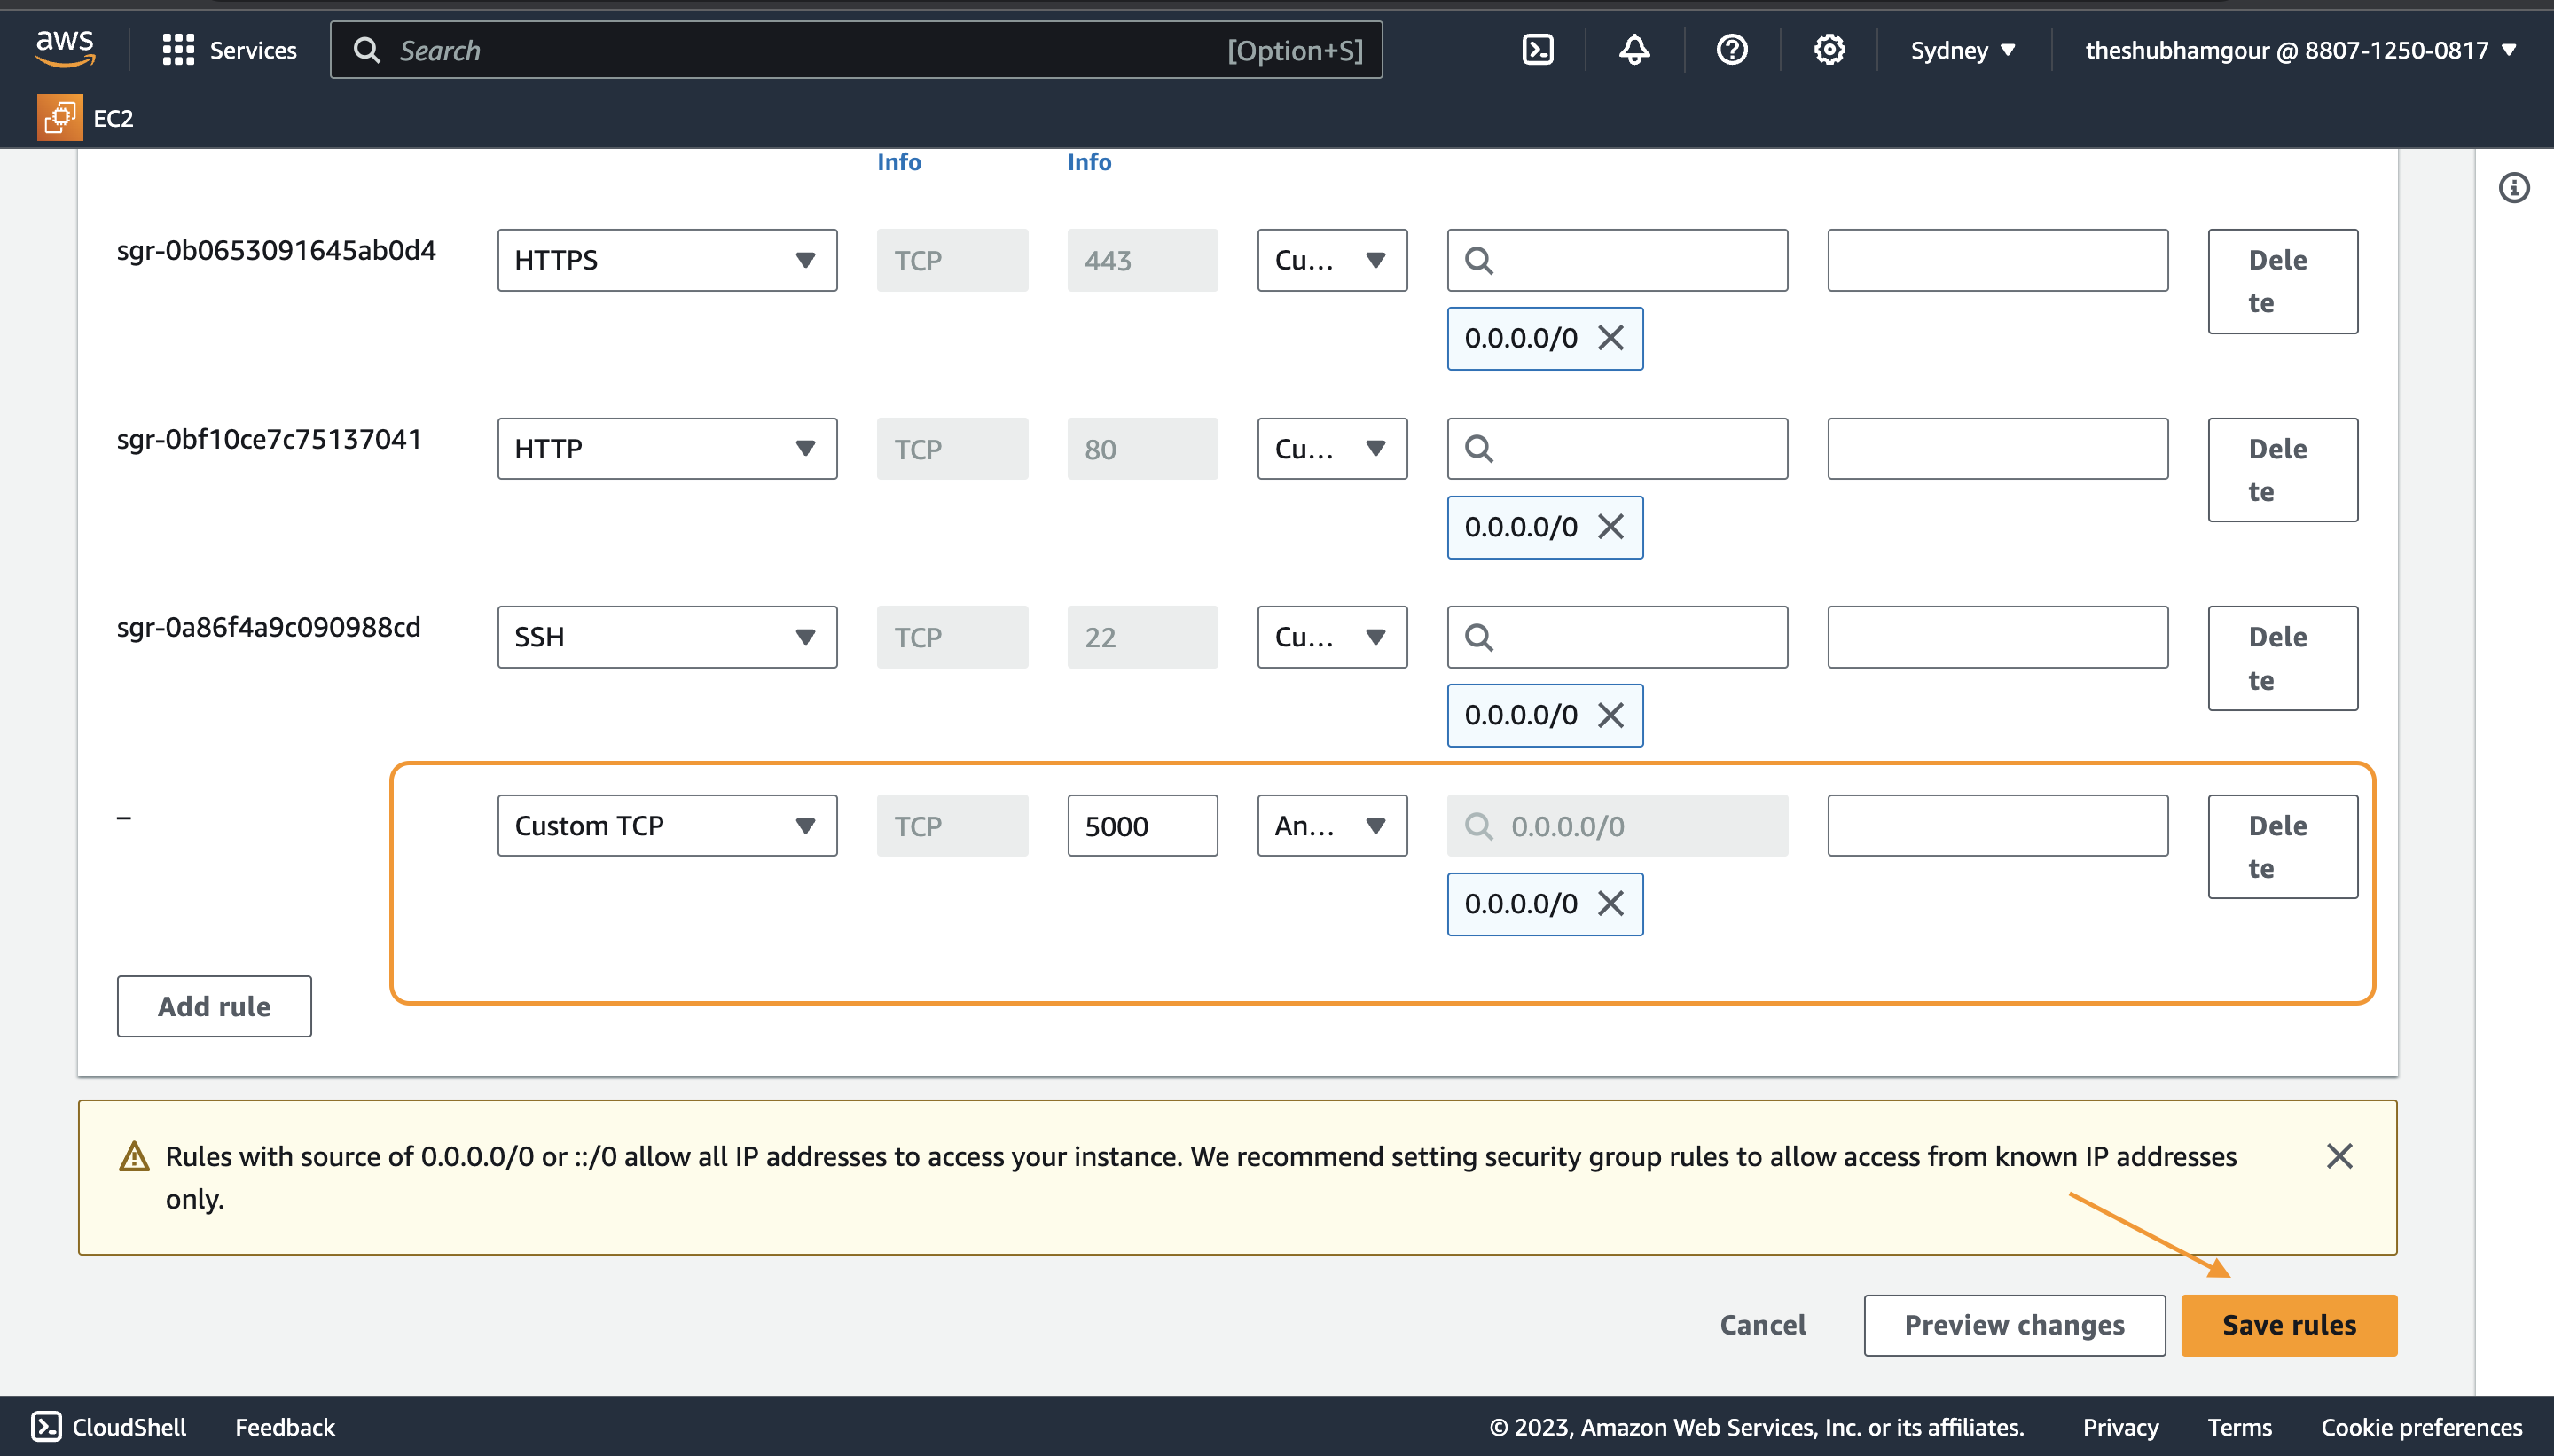
Now copy the public ip followed by :5000 you should resemble the below
<public-ip>:5000
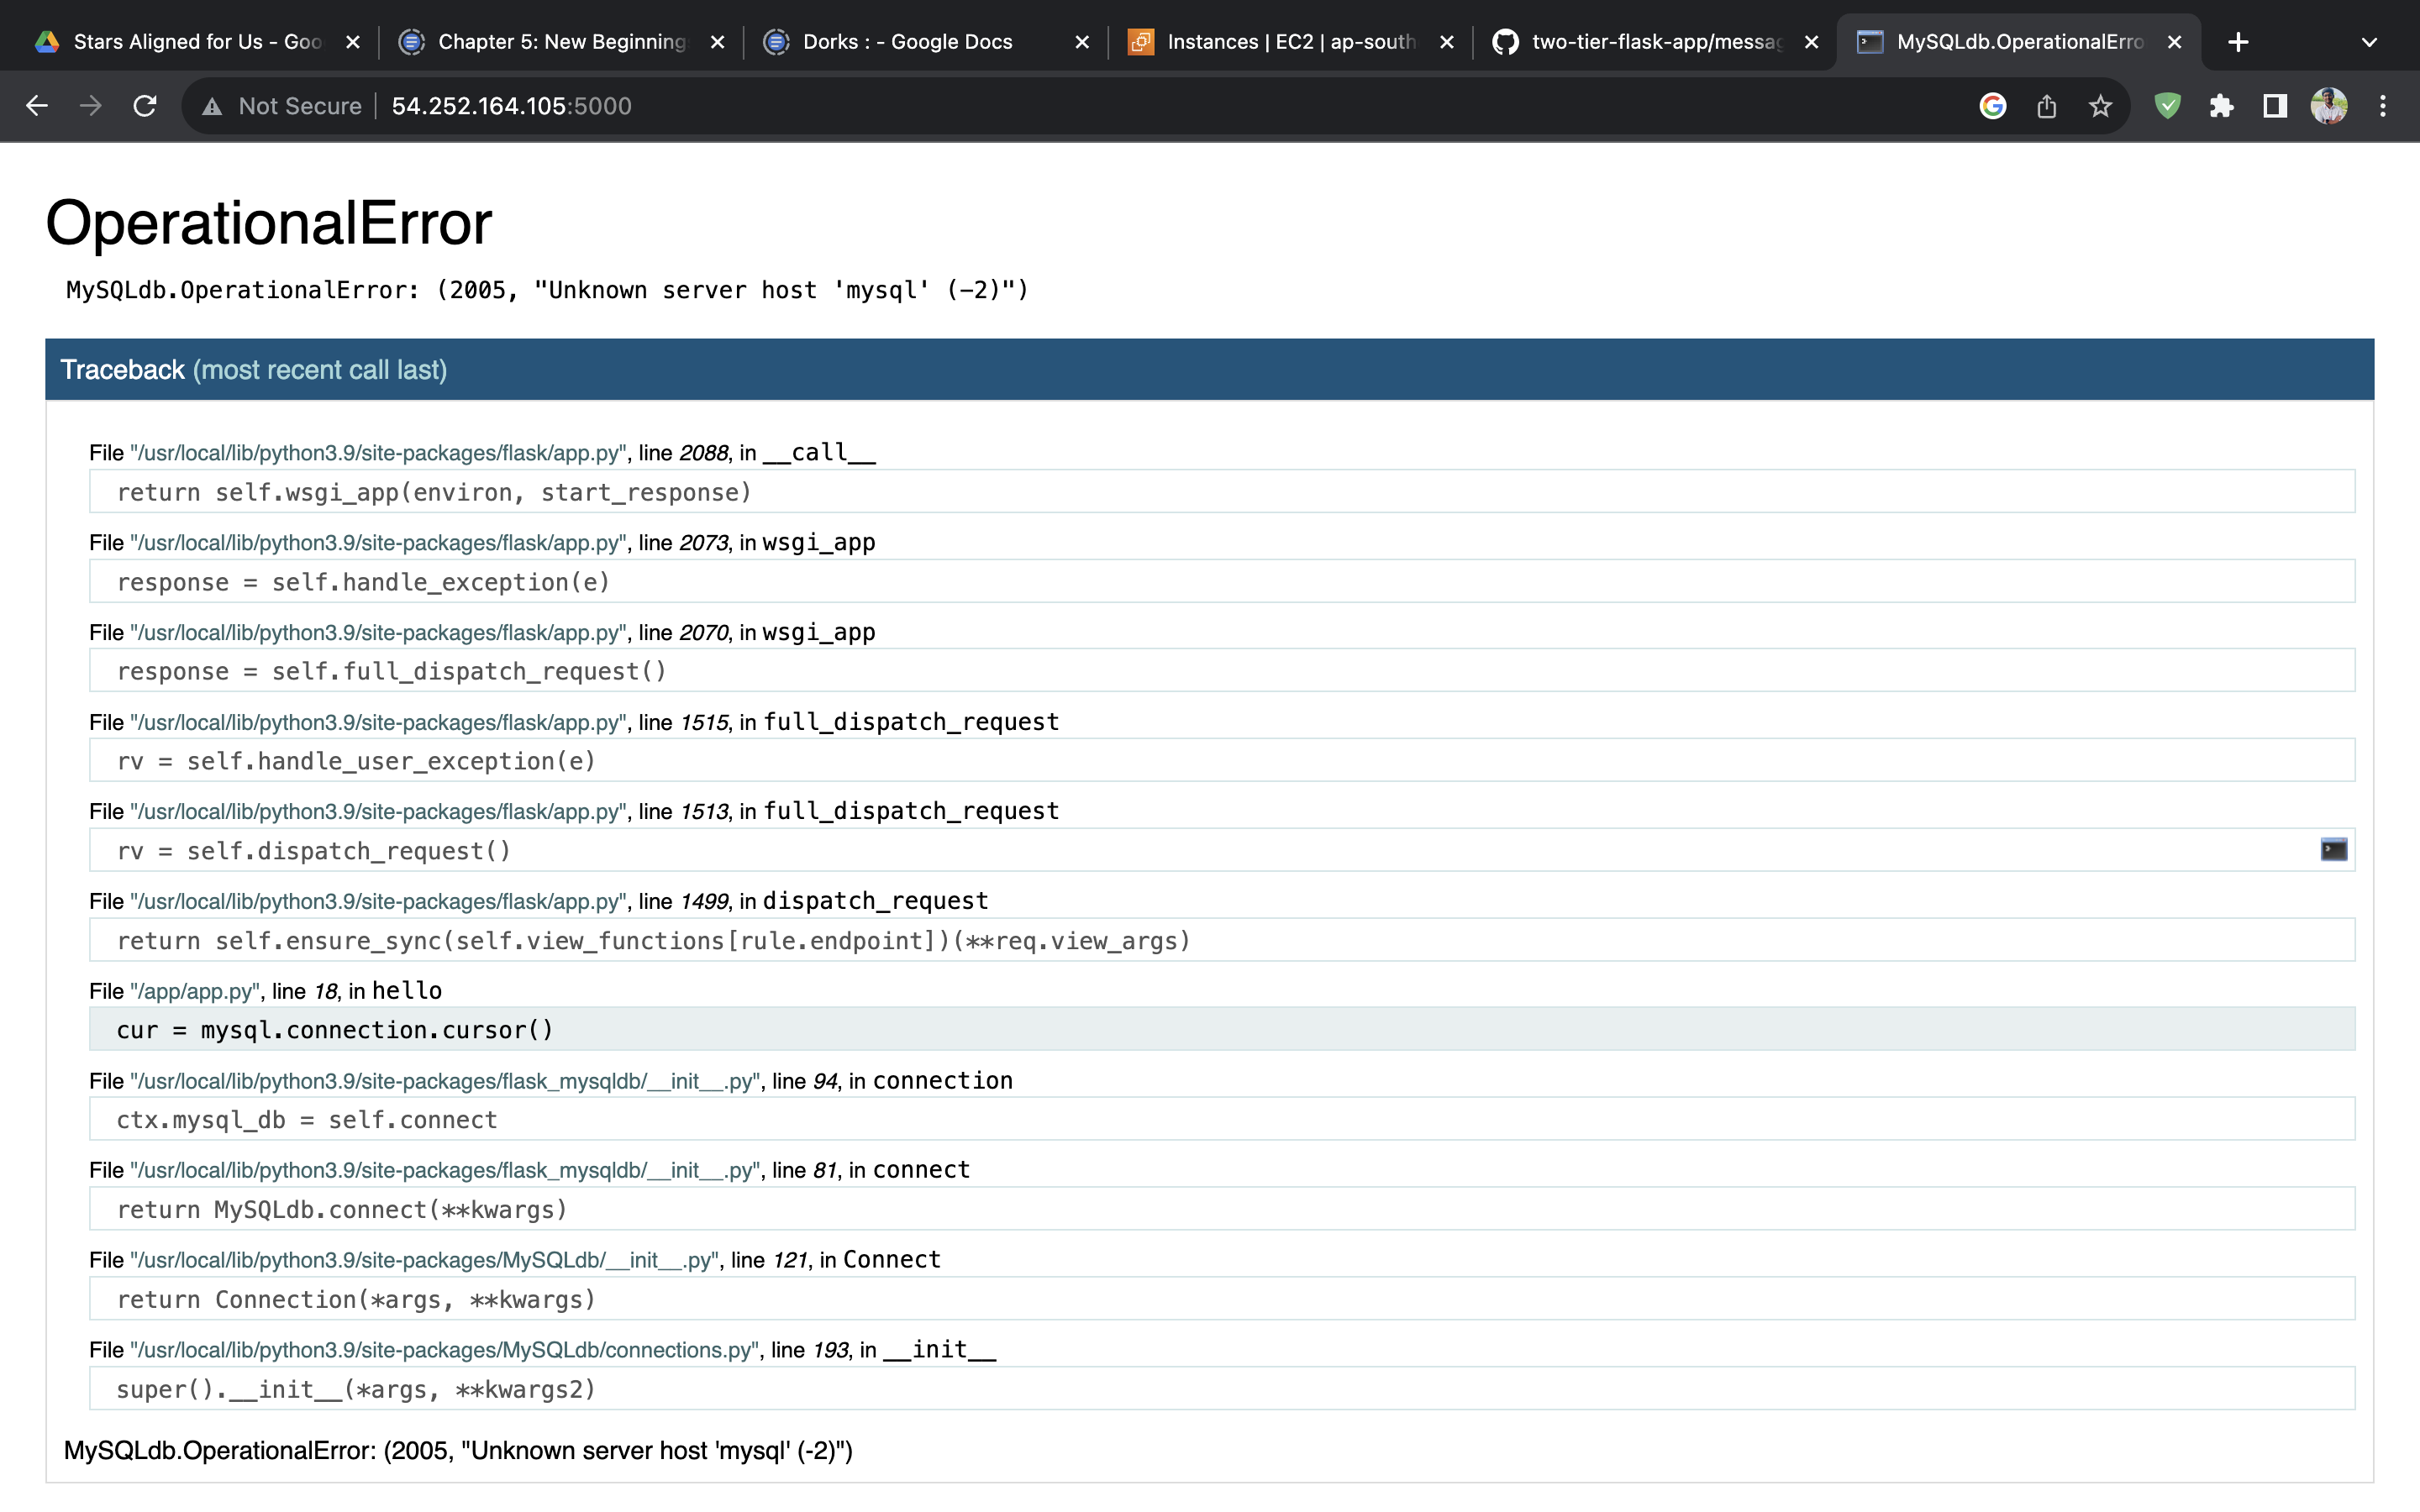
The error message "MySQLdb.OperationalError: (2005, 'Unknown server host 'mysql' (-2)')" indicates that there's an issue with the hostname resolution for the MySQL server. This typically happens when the application (in this case, Flask app) is unable to find the host 'mysql' that you specified in the connection settings.
Section 4 : Docker image mapping
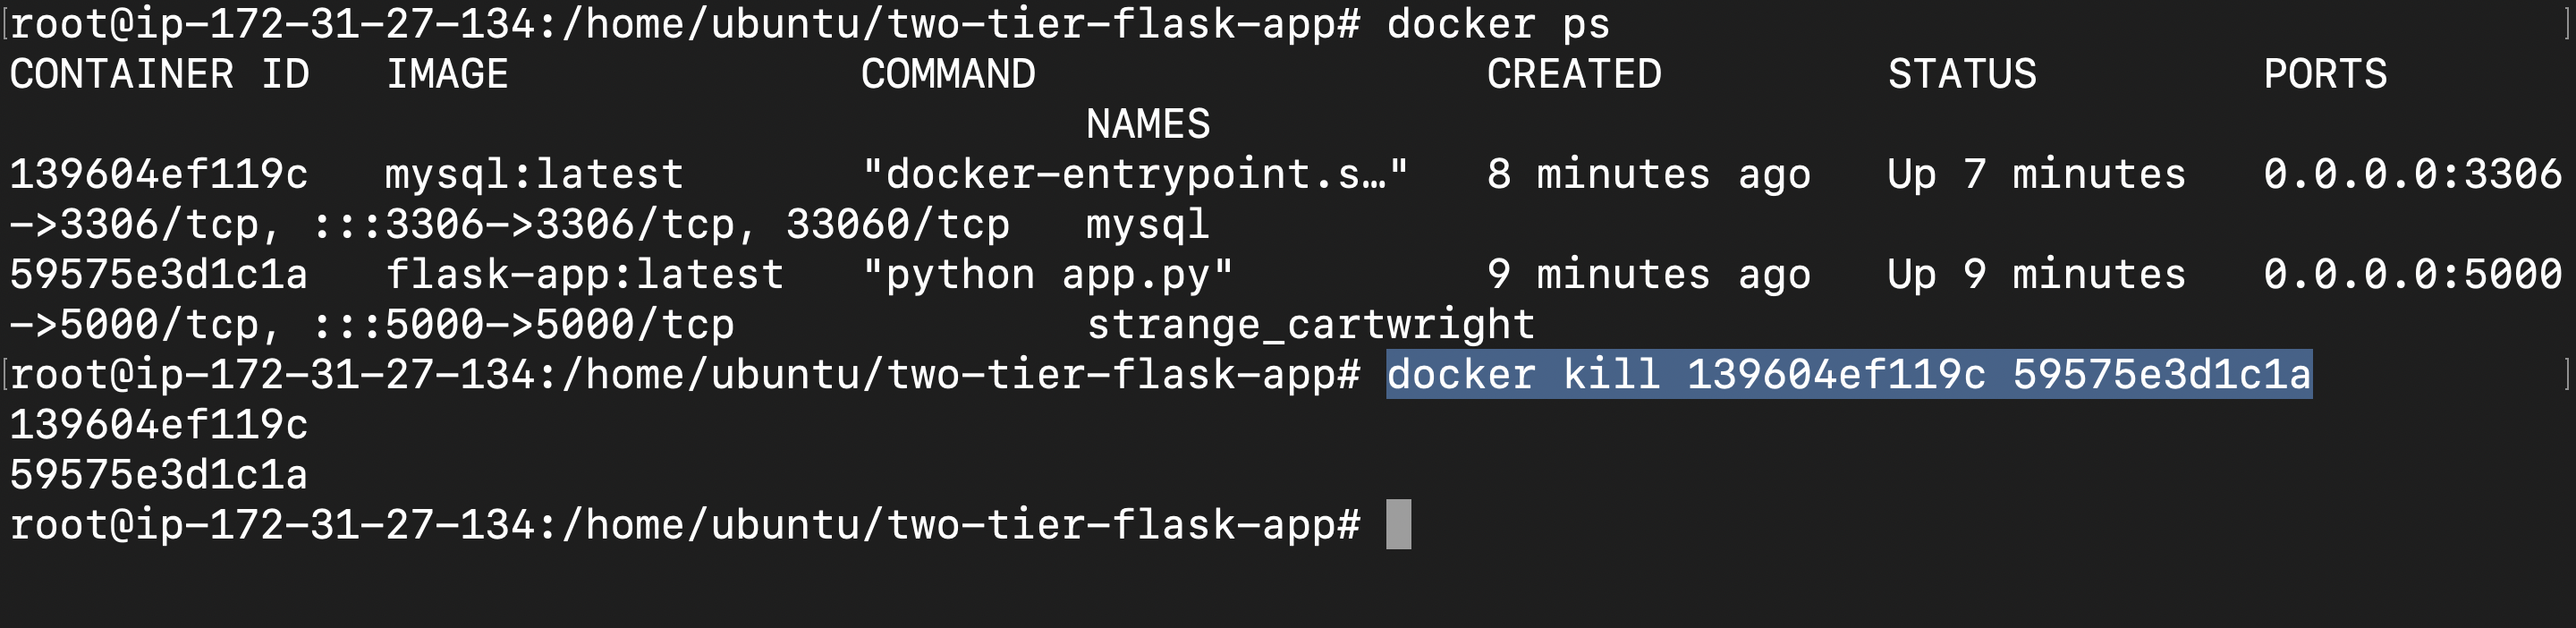
Now you need to kill the running images and to do so execute the below command
docker kill 139604ef119c 59575e3d1c1a
here are the hashes as the docker container ID which you can get by running docker ps
The docker network ls command lists all the networks created on your Docker host. You can use this command to check which networks are available and to verify if your containers are connected to the same network.
docker network ls
docker network create -d bridge two-tier-app-nw

Here's a brief breakdown of the command:
docker network create: Initiates the creation of a Docker network.-d bridge: Specifies the driver for the network. In this case, it's the default bridge driver, which is suitable for most use cases.two-tier-app-nw: This is the name you've given to your network. You can replace it with any name that makes sense for your application.
By creating a custom bridge network, you've set up an isolated environment for your containers to communicate, making it easier to manage and ensuring that your containers can find each other using their container names as hostnames.
Now incase if you are getting error while running the images execute followed by kill command
docker system prune
The docker system prune command is a powerful tool for cleaning up your Docker system by removing unused data, such as stopped containers, unused networks, and dangling images. It helps free up disk space and keep your Docker environment tidy.
Now we are all set to go : Let's add MySQL to the network two-tier-app-nw we created
docker run -d -p 3306:3306 -e MYSQL_DATABASE=testdb -e MYSQL_USER=admin -e MYSQL_PASSWORD=admin -e MYSQL_ROOT_PASSWORD=test@123 --name mysql --network two-tier-app-nw mysql:latest
a9e1f9730f72ce1a6ea772f319061735fd51510140cb20ec432d36a3801e84be
Here's a quick breakdown of your docker run command:
-d: Runs the container in the background (detached mode).-p 3306:3306: Maps port 3306 on your host to port 3306 in the container, allowing you to access the MySQL service on your host machine.-e: Sets environment variables for configuring MySQL.MYSQL_DATABASE=testdb: Creates a MySQL database namedtestdb.MYSQL_USER=admin: Sets the MySQL user toadmin.MYSQL_PASSWORD=admin: Sets the password for the MySQL user.MYSQL_ROOT_PASSWORD=test@123: Sets the root password for MySQL.
--name mysql: Assigns the namemysqlto your container.--network two-tier-app-nw: Connects your container to thetwo-tier-app-nwnetwork.mysql:latest: Specifies the MySQL image to use, in this case, the latest version.
Now it's time to set the flask :
docker run -d -p 5000:5000 -e MYSQL_HOST=mysql -e MYSQL_USER=admin -e MYSQL_PASSWORD=admin -e MYSQL_DB=testdb --name flask-app --network two-tier-app-nw flask-app:latest
Here's a quick breakdown of your docker run command:
-d: Runs the container in the background (detached mode).-p 5000:5000: Maps port 5000 on your host to port 5000 in the container, allowing you to access your Flask app from your host machine.-e: Sets environment variables for configuring your Flask app to connect to MySQL.MYSQL_HOST=mysql: Specifies the hostname of the MySQL container.MYSQL_USER=admin: Sets the MySQL user toadmin.MYSQL_PASSWORD=admin: Sets the password for the MySQL user.MYSQL_DB=testdb: Specifies the MySQL database to connect to.
--name flask-app: Assigns the nameflask-appto your container.--network two-tier-app-nw: Connects your container to thetwo-tier-app-nwnetwork.flask-app:latest: Specifies the Docker image to use for your Flask app, in this case, the latest version.

Section 6 : Inspecting Docker Network
The docker inspect command is used to obtain detailed information about Docker objects, including networks. To inspect the two-tier-app-nw network, you can use the following command:
docker inspect two-tier-app-nw

here we validated that both the containers are on same network which is two-tier-app-nw
Now when you check your AWS on Public IP
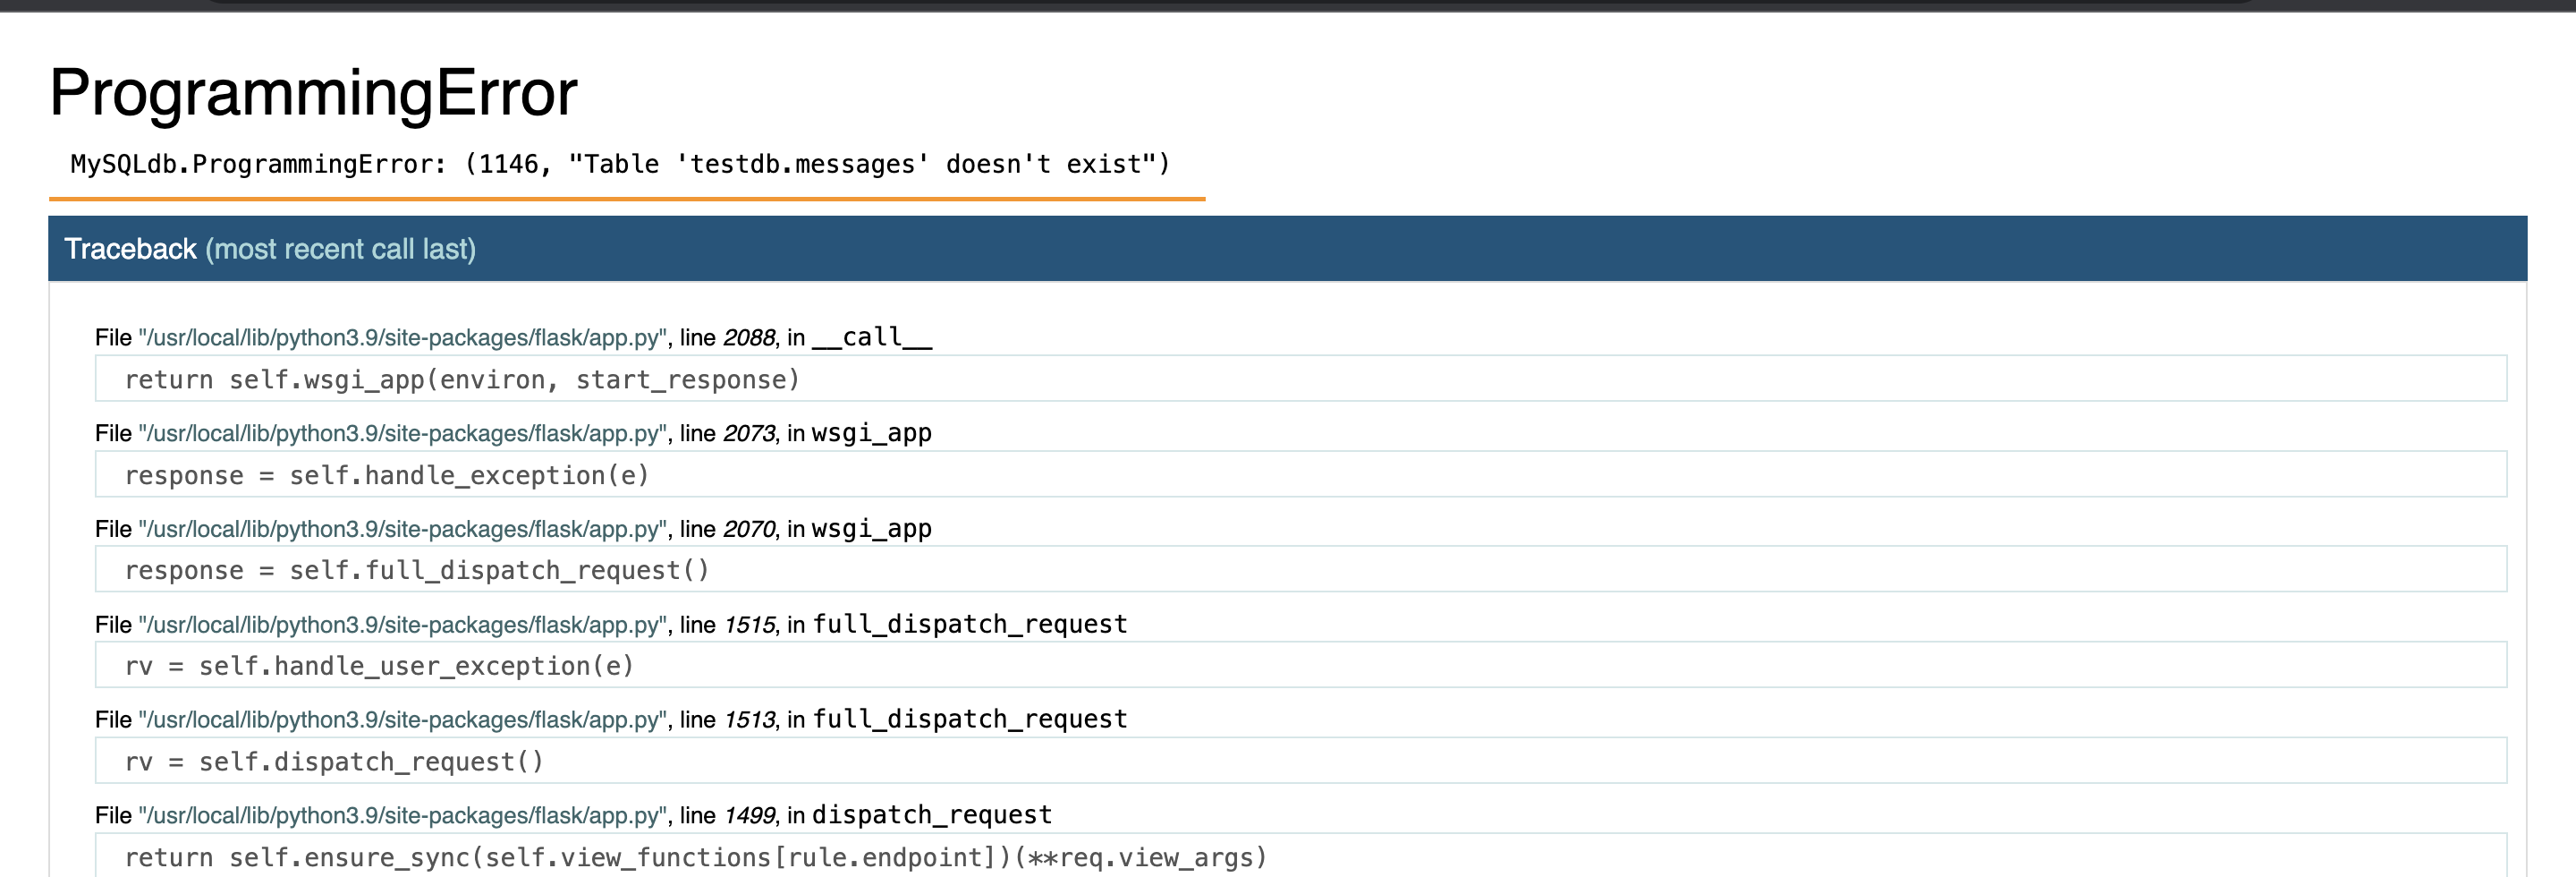
The error MySQLdb.ProgrammingError: (1146, "Table 'testdb.messages' doesn't exist") indicates that your Flask app is attempting to access a table named messages in the testdb database, but the table doesn't exist in the MySQL database.
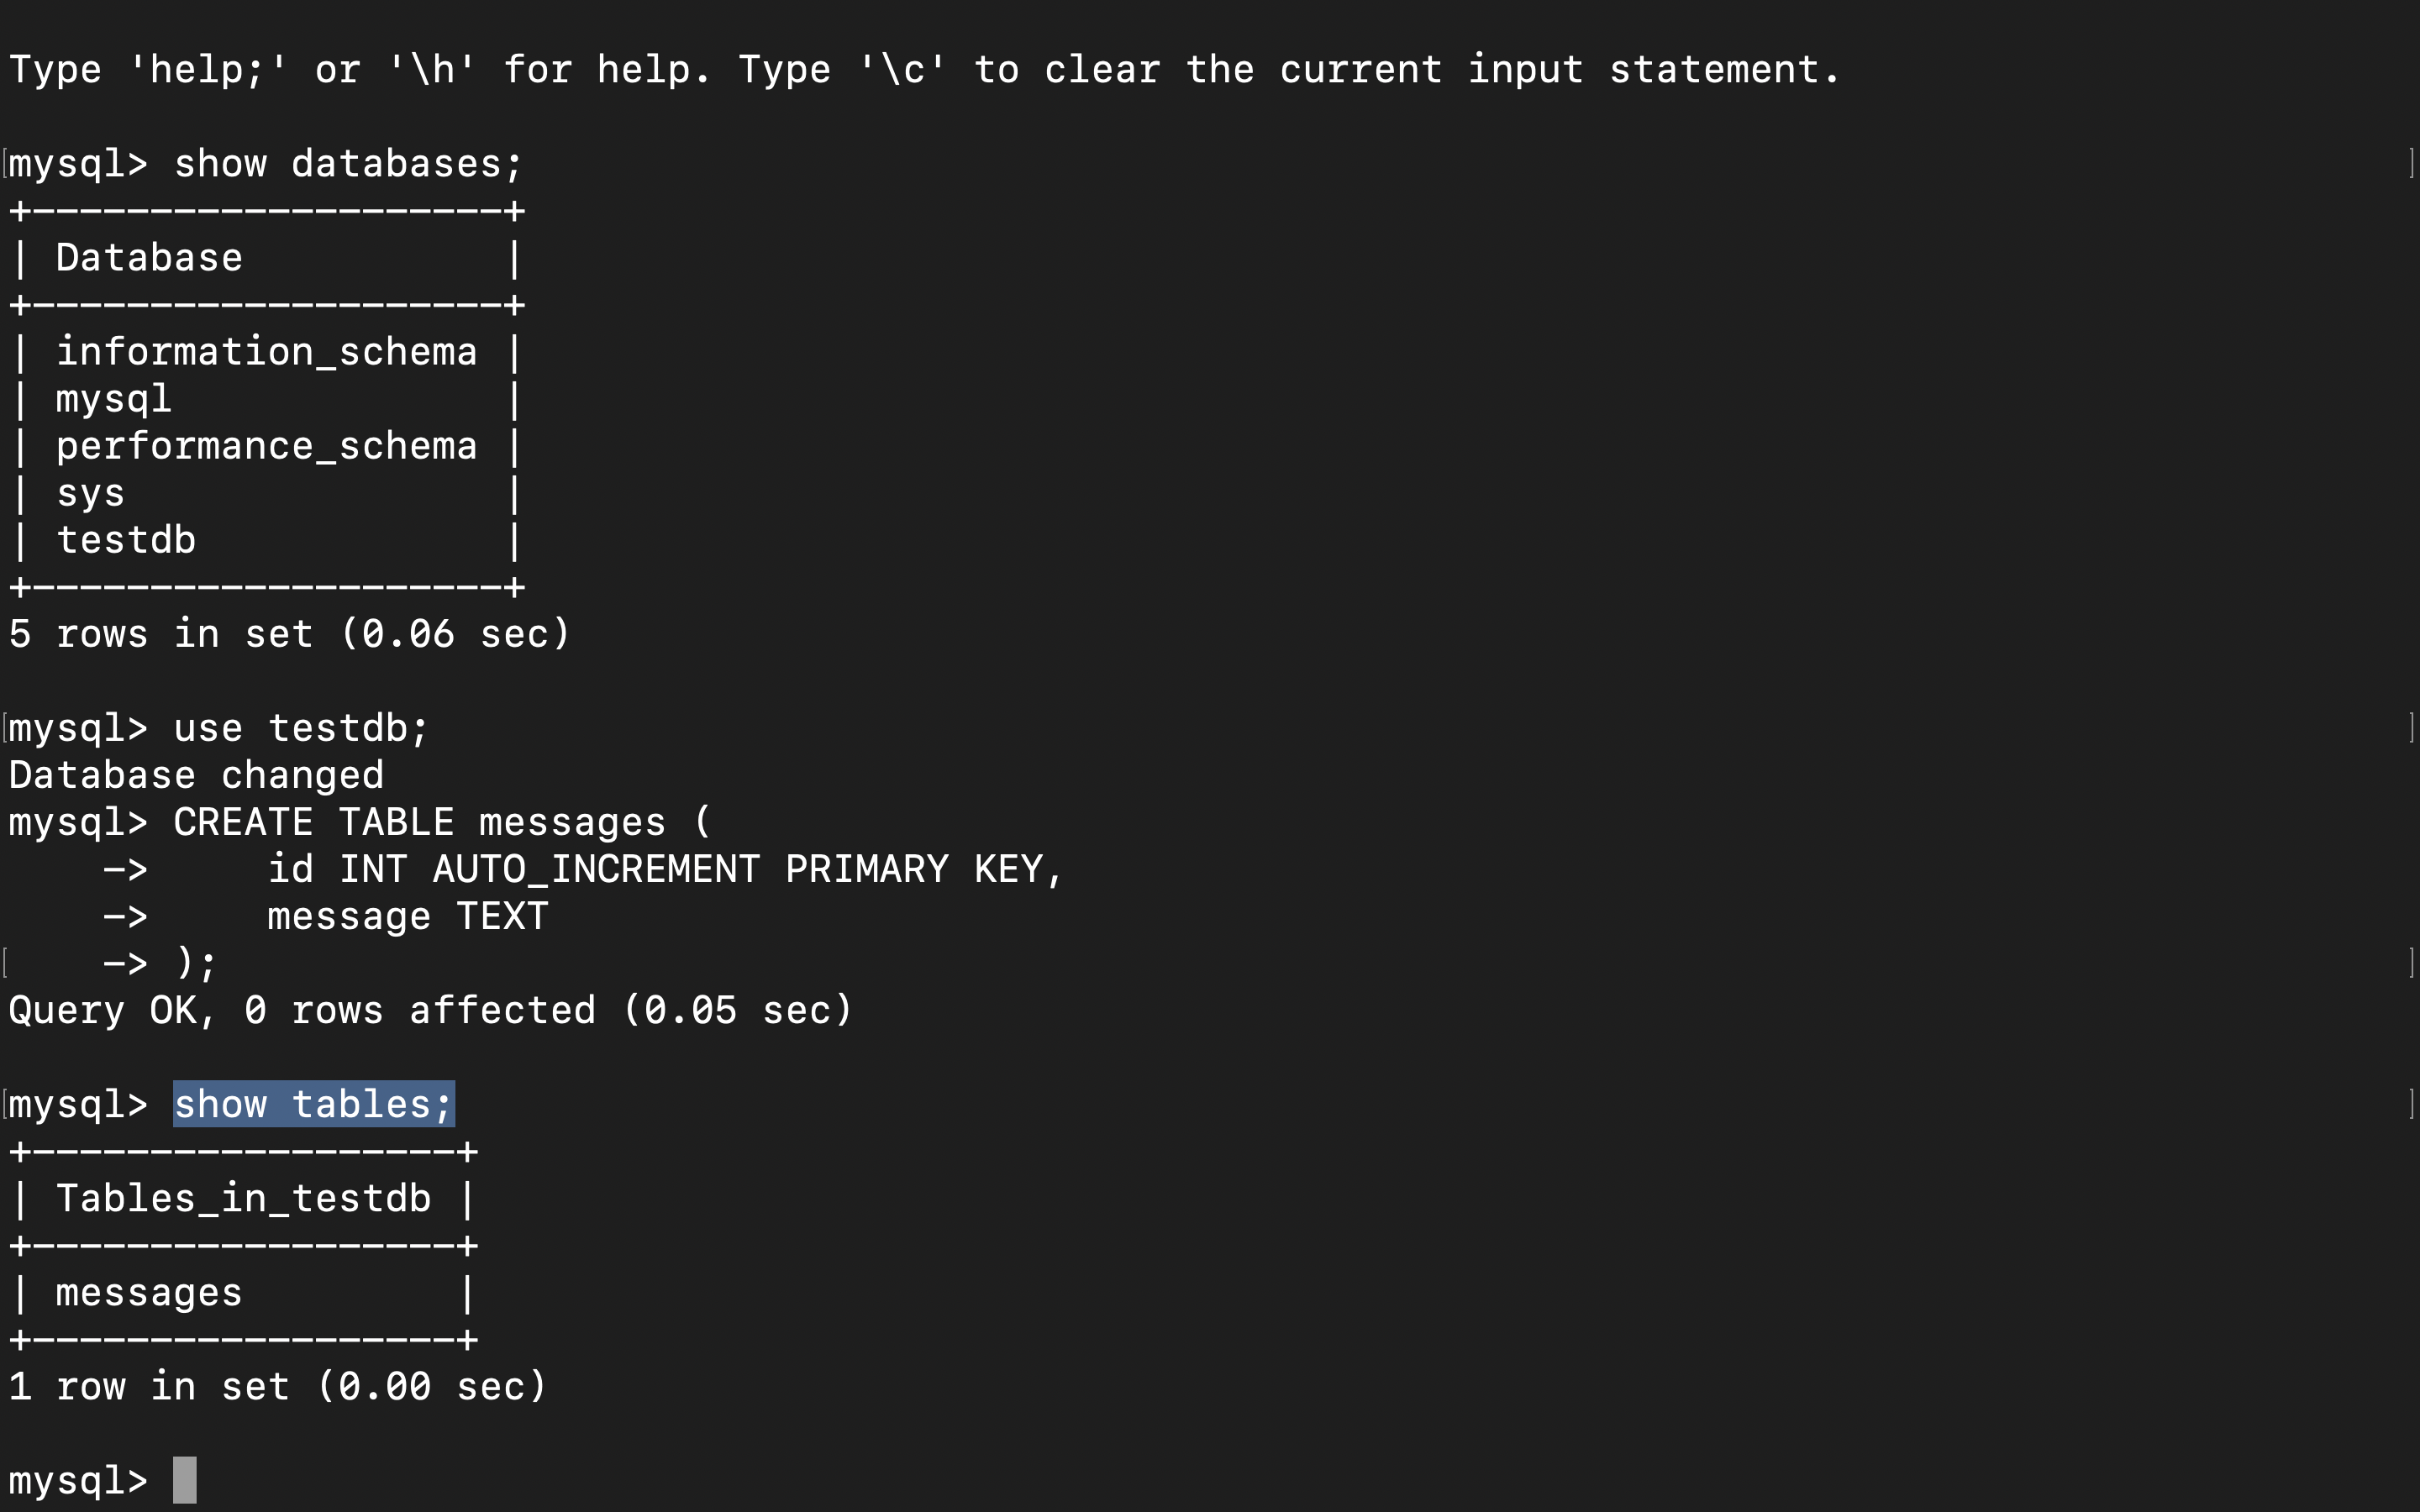
Now let's create the DB in our docker container
docker exec -it a9e1f9730f72 bash

execute the below commands :
show databases;

use testdb;

CREATE TABLE messages (
    id INT AUTO_INCREMENT PRIMARY KEY,
    message TEXT
);

show tables;
Now when you refresh you page on AWS you will get the below and congratulation you have done it!!

Enter some message and hit on Submit
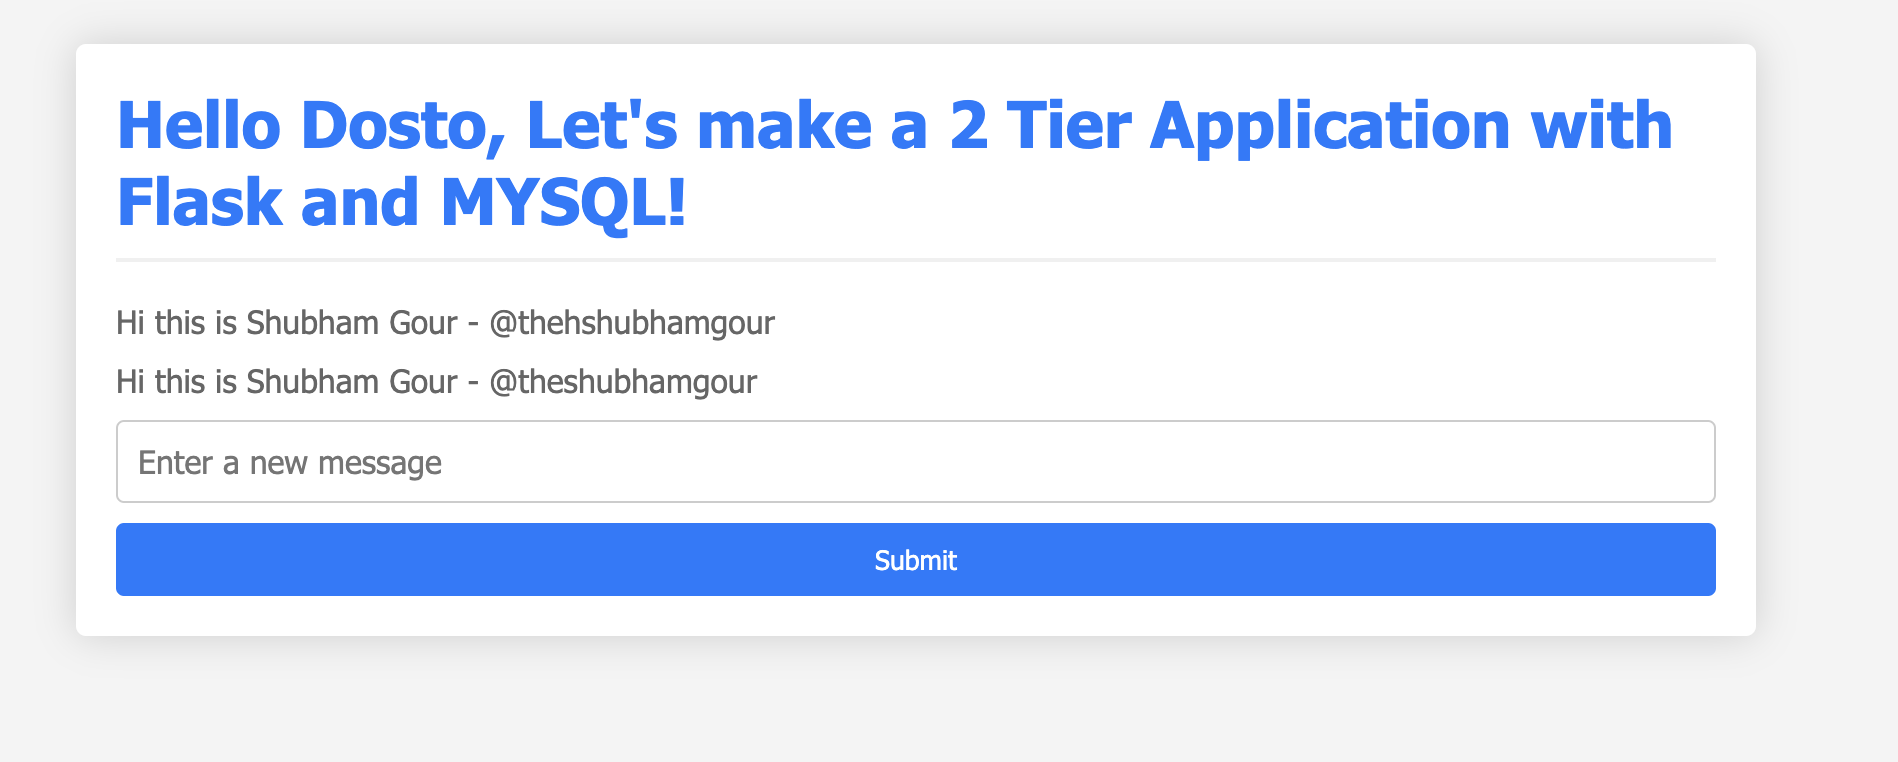
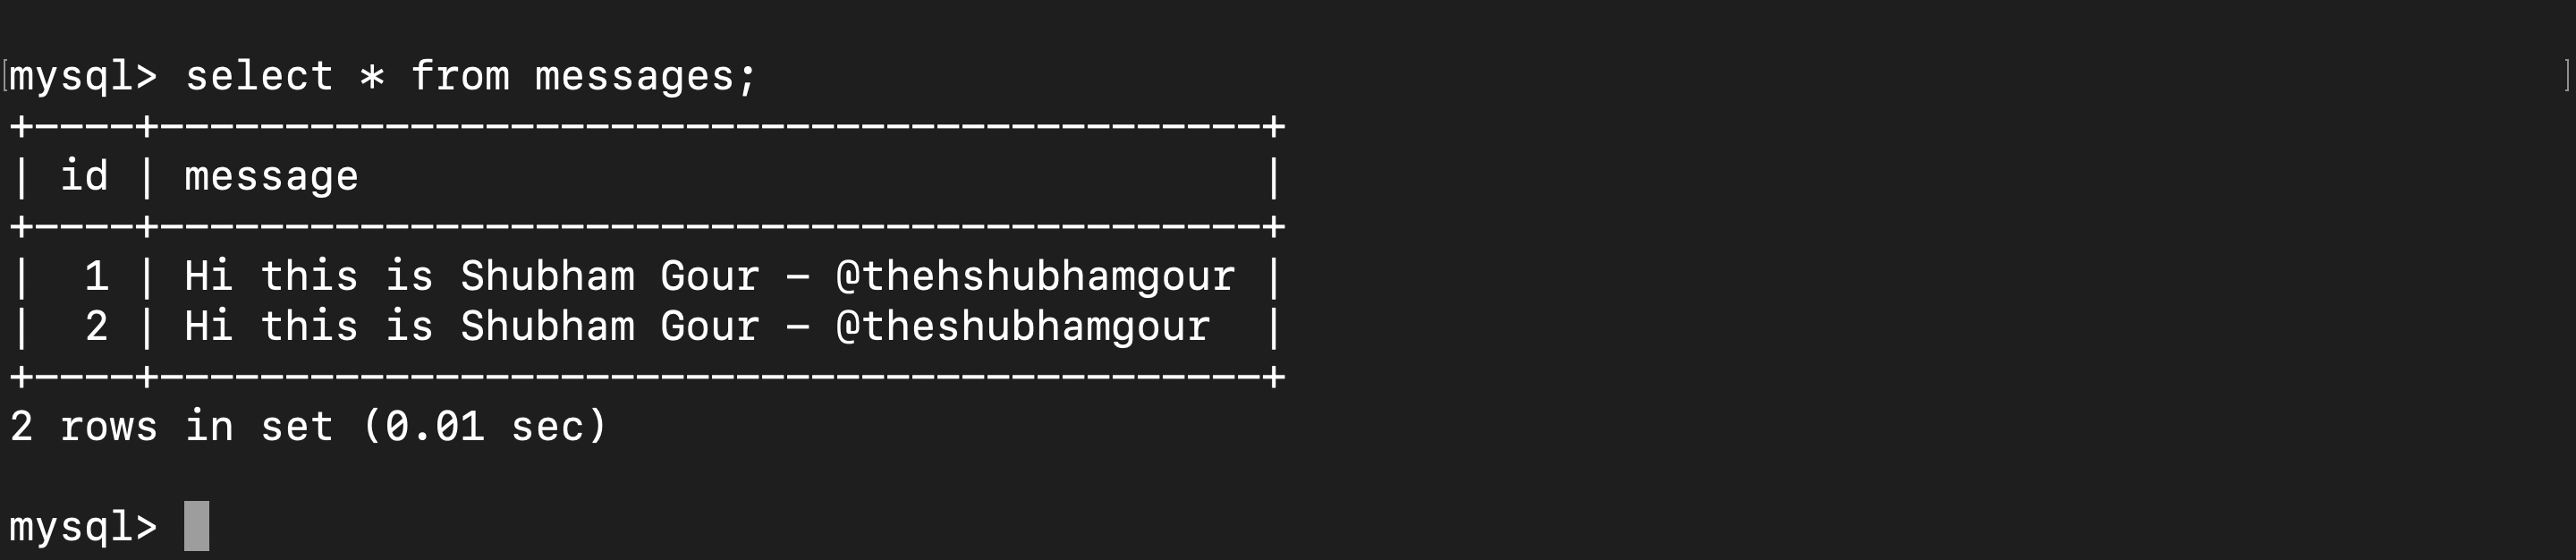
Now lets validate it on DB
select * from messages;
Conclusion
In our exploration of Docker and MySQL, we've set sail into a realm of containers, networks, and data. Docker's enchanting spells, cast through docker run commands, allowed us to orchestrate a symphony of Flask and MySQL containers.
We carefully crafted a MySQL database, but challenges surfaced—unknown hosts and missing tables. Yet, armed with debugging tools and logs, we navigated through stormy errors, emerging victorious.
The outcome? A harmonious duo: Flask app on port 5000, MySQL guarding its treasures on port 3306. Our journey concludes with lessons learned, a resilient two-tier app, and newfound skills for future exploits.


